Website root
A page of this type is the starting point of a website within the page structure. A Contao instance can manage multiple websites, which can, for example. have different languages or run completely independently under different domains (multi-domain operation).
Name and type
Page name: The page name is displayed in the navigation and used as a fallback for the page title.
Page type: Here you can define the type of page.
Routing
Page aliases: The alias of a page is a unique and meaningful reference that you can use to access a page in your browser. If you leave this field empty when creating a page, Contao will automatically generate the alias.
Metadata
The metadata of a page mostly refers to the corresponding meta tags in the header area of the HTML page. You can use them to define the title and description of a page, among other things.
Page title: The page title is used in the <title> tag of the website and often appears in search results of
Google and Co. It should not contain more than 65 characters, because many search engines will simply cut off longer
titles. If no page title is defined, the page name is used as a fallback.
Output in source code:
<title>Contao Open Source CMS</title>
URL settings
The URL settings together with the language settings determine which website root Contao shows, depending on the domain and the language of the visitor’s browser. These settings also define the format of the URLs generated by Contao.
Domain name: If you want a website in your site structure to be accessible under a specific domain such as “company.com”, you can enter it here. If a visitor then calls up “company.com” in his browser, they will be automatically redirected to the corresponding website root of a website.
Protocol: If your website is reachable via HTTPS then this setting must be configured accordingly. Your visitors will be automatically redirected to HTTPS.
since 5.3 If you select HTTPS, Contao will also automatically send the Strict-Transport-Security
(HSTS) HTTP header, making your site even more secure. Of course this only applies to resources delivered by Contao, but not to anything that is delivered directly via the web server for example.
If you use an SSL certificate for your domain then you must change this setting from http:// to https://.
Otherwise you might get an infinite redirect in the front end, if your hosting environment automatically redirects from
http:// to https://.
URL prefix: With this setting, an optional URL prefix can be assigned to all page aliases below this starting point. The URL prefix is freely selectable and therefore independent of the language set. In order to benefit from this setting, you must deactivate “Legacy routing”.
URL suffix: This setting can be used to change or remove the “URL suffix”. The URL suffix is appended to the page alias when the URL of a page is generated. In order to benefit from this setting, you must deactivate “Legacy routing”.
Alias settings: The slug generator allows you to select an individual character set for automatically generated aliases.
| Alias Settings | Declaration |
|---|---|
| Unicode numbers and small letters | The alias über-uns is generated from the page name “Über uns”. |
| Unicode numbers and letters | The alias Über-uns is generated from the page name “Über uns”. |
| ASCII numbers and small letters | The alias ueber-uns is generated from the page name “Über uns”. |
| ASCII numbers and letters | The alias Ueber-uns is generated from the page name “Über uns”. |
For the creation of the alias, the defined language is also relevant in some cases. For instance the German word “über” would be converted to “ueber” while the finish word “eläinkö” would be converted to “elainko”.
Enable folder URLs: Here you can activate folder structures in page aliases. This will
add the aliases that exist in the page hierarchy to the alias, e.g. the page “Download” in the page path “Docs >
Install” will use the alias docs/install/download.html instead of just download.html.
Legacy Routing Mode
The settings URL prefix and URL suffix as well as Disable language redirect are only available if the so called
“legacy routing” mode is disabled via the contao.legacy_routing setting. When not disabled the URL generation will continue
to be influenced only via the contao.prepend_locale and contao.url_suffix setting.
# config/config.yml
contao:
    legacy_routing: false
However, be advised that disabling the legacy routing mode also disables the following hooks:
If you have any extensions installed that still rely on either of these hooks, then you must either keep legacy routing enabled or you need to remove or replace these extensions. Otherwise an error in the front end will occur.
Language settings
Language: Here you can set the language of the website root. Languages are recorded via their primary subtag
according to ISO 639-1, e.g. de for German or en
for English.
Language fallback: Contao always searches for a website root in the language that a visitor has selected in his browser. If there is only a German website root, an English visitor would only see the error message “No pages found” because there is no website in his language.
To avoid this, you can define a certain website root as a fallback, which freely translated means “welcome page” or “alternative page”. This fallback page will then catch all visitors who cannot be assigned to a website root due to their language settings.
So make sure to always define a website root as the language fallback. Otherwise your website can only be accessed by German visitors! Also the robots of the search engines that index your website usually speak English and would also be excluded without a language fallback. Your pages would then never appear on Google despite careful optimization.
Disable language redirect: When using a website with multiple languages within the same Domain then Contao will automatically redirect to the website root of the browser’s language (or the fallback language otherwise) whenever the domain is requested without any other parameters. You can exclude certin (or all) website roots from this automatic redirect through this setting.
Website settings
Favicon: This allows you to select a favicon for the /favicon.ico URL of your domain. This is especially useful
for multi-domain setups so that you can easily serve different favicons for different domains from within the same
Contao instance, since you can only have one physical favicon.ico file in your document root otherwise. This will
enable you to show the correct favicon per domain, if any non-HTML resources are displayed in the browser directly
(like images or PDFs, etc.). You can set a favicon only once for the same domain. This must be done in the fallback
language.
Keep in mind that this feature will not add any additional meta tags to the HTML output.
Keep in mind that this will not work if you already have a physical favicon.ico file in your document root, as the
web server will then serve said file directly. Make sure to delete that file before trying to use this feature.
Custom robots.txt content: This allows you to define the content of the /robots.txt URL of your domain. This is
especially useful for multi-domain setups, since you can only have one physical robots.txt file in your document
root otherwise. This will enable you to define different directives per domain.
For the same domain you can set robots.txt only once. This must be done in the fallback language.
Keep in mind that this will not work if you already have a physical robots.txt file in your document root, as the web
server will then serve said file directly. Make sure to delete that file before trying to use this feature.
Maintenance mode: If this item is enabled, visitors to the site will see that it is currently being maintained. For the maintenance page there is a Page type: 503 Service unavailable.
Content Security Policy
This feature is available in Contao 5.3 and later.
In this section you can enable and configure the Content-Security-Policy header for the front end of your website.
Before enabling you should familiarize yourself with the syntax of CSP directives and their effects, e.g. via the
official reference or the MDN Web Docs.
Enable CSP: This allows you to enable the Content-Security-Policy header for your website.
Content Security Policy: Here you can enter the Content Security Policies that should be applied on your website in
the form of an actual Content-Security-Policy header. The default is default-src 'self' - meaning only resources
from the current domain will be accepted.
Reporting only: This enables a mode where the browser does not enforce the Content Security Policies, but still reports on them.
Enable report logging: This enables logging of CSP violation reports sent by the browser. These reports will then appear in the system log.
Enabling CSP typically means that external resources and inline scripts and styles are disallowed. If your website needs to allow this programmatically, have a look at the developer documentation on how to do this. Additionally disallowing inline styles also means that the inline styles generated by Contao’s rich text editor, TinyMCE, would not work anymore. Contao will however automatically add hashes for these styles - but only for allowed styles. If your TinyMCE config allows other inline styles, you will need to specfically allow them in the settings.
Global settings
Mailer transport: In many cases, SMTP servers do not allow the sending of arbitrary sender addresses. In most cases, the sender address must match the SMTP server access data used. However, especially in multi-domain installations of Contao, it can be important that the sender address of the emails that Contao sends matches the respective domain. Therefore, you can create so-called “transports” and select them here.
Enable rel=“canonical”: Within the page type “Starting point of a website” you can allow the output of rel=“canonical” tags.
E-mail address of the website administrator: Here you can overwrite the e-mail address of the system administrator defined in the backend settings for a specific website. This address is used to send notifications about blocked accounts or newly registered users, for example. If you have multiple websites within the site structure, it may be useful to set a separate administrator for each website, who will only receive notifications from his website. You can also use the following notation to add a name to your email address:
Kevin Jones [kevin.jones@example.com]
Date format: Here you can overwrite the date format defined in the backend settings. In contrast to the backend, which only supports numeric formats, you can also use text formats in the front end.
Time format: Here you can overwrite the time format defined in the backend settings. Text formats are also supported in the front end.
Date and time format: Here you can override the date and time format defined in the backend settings. Text formats are supported.
Contao supports all date and time formats that can be parsed with the PHP function date. To convert any input into a UNIX timestamp, only numeric formats (j, d, m, n, y, Y, g, G, h, H, i, s) are allowed in the back end.
Here are some examples of valid dates and times:
| Specifications | Declaration |
|---|---|
| Y-m-d | YYYY-MM-DD, international ISO-8601, for example 2005-01-28 |
| m/d/Y | MM/DD/YYYY, English format, for example 01/28/2005 |
| d.m.Y | DD.MM.YYYY, German format, for example 28.01.2005 |
| y-n-j | JJ-M-T, without leading zeros, e.g. 05-1-28 |
| Ymd | YYYYMMDD, time stamp, for example 20050128 |
| H:i:s | 24 hours, minutes and seconds, for example 20:36:59 |
| g:i | 12 hours without leading zeros and minutes, for example 8:36 |
File URL: For example, if you want to specify a content delivery network for the files directory, you can enter
the file URL here.
Assets URL: If you want to define a content delivery network for the assets directory, for example, you can enter
the file URL here.
Access protection
In contrast to access rights, which define the rights in the back end, access protection refers to the protection of a page from access in the front end. Visitors must first log in with their username and password before they can access the page. Otherwise they would only see an error page.
Protect page: Here you can restrict access to a page. If you do not select this option, access protection is inherited from a parent page.
Allowed member groups: Here you can define which member groups are allowed to access the page. To configure members and member groups, see the System Administration page.
Layout settings
A page layout is a prerequisite for Contao to be able to display a page in the front end at all. If no page layout has been assigned or inherited, Contao will show an error saying “No layout specified” in the front end.
Assign a layout: Here you can assign a page layout to a page. The assignment automatically applies to all sub pages without a page layout.
Page layout: Here you can see all available page layouts grouped by themes. You activate a theme by assigning a page layout.
Subpage layout: With the selection of »Inherit page layout« (default) the assignment of the page layout also applies to all sub pages without their own page layout. Alternatively, a separate, different page layout for sub pages can be assigned here.
Two-factor authentication
You can enforce two-factor authentication for all members (front end) here. Select a page that visitors will be redirected to when they set up the two-factor authentication.
Cache settings
In the cache settings you can define if and how long a page should be cached. Cached pages load much faster because they do not have to be generated by Contao and they do not need a connection to the database for delivery.
Set cache timeouts: Here you can assign a cache time to a page. If you do not select this option, the cache settings are inherited from a parent page.
Private cache timeout (Client cache timeout): Allows you to assign a cache time to a page. This sets the time in seconds after which the browser will consider the page out of date.
Shared cache timeout (Server cache timeout): Here you can assign a cache time to a page. This defines the time in seconds after which the page is considered obsolete by a shared cache.
Note that for security reasons, pages are only cached if they are not protected and no user is logged on to the back end. Otherwise, there is a risk that confidential data is written to the cache and accidentally displayed in the front end. So don’t be surprised if your password-protected pages don’t show up in the cache despite their assigned expiration time.
Always load from shared cache: Always load this page from the shared cache, even if a member is logged in. Note that in this case you will not be able to personalize the page for logged in members.
Access rights
Via access rights you define which users in the back end (!) are allowed to access a page and what they can do with this page and the articles it contains. Similar to the Unix permissions system, each page belongs to a specific user and user group and has three levels of access:
- Access as owner of a page
- Access as member of the group of a page
- Access as any other back end user
For example, the “Company” page is assigned access rights and belongs to the user h.lewis and the user group News. Both the user and everyone in the user group can edit articles on the page, but only the owner, h.lewis, and you the administrator can edit the page and change its title.
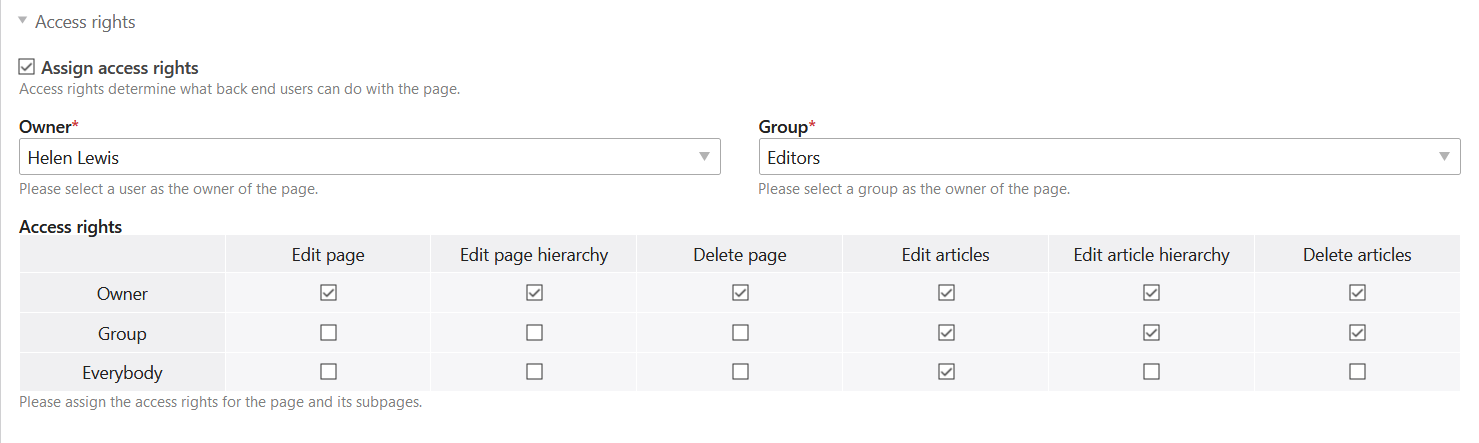
Assign access rights: Here you can assign access rights to a page. If you do not select this option, the access rights will be inherited from a parent page.
Owner: Here you can set the owner of the page.
Group: Here you define the group of the page.
Access rights: Here you assign the rights to the individual access levels.
For more information on the permissions system and the configuration of users and user groups, see the system settings page.
Publication
As long as a page is not published, it practically does not exist in the front end and cannot be accessed by visitors. In addition to manual publishing, Contao also offers the possibility to activate pages automatically on a specific date. This way you can, for example, apply for a limited time offer.
Publish page: Here you can publish a page.
Show from: Here you activate a page on a specific date.
Show until: Here you deactivate a page at a certain date.