Text elements
Code
The content element “Code” adds formatted code to the article. You enter the code with a so-called code editor. Contao uses the Open Source code editor from Ace.
Text/HTML/Code
Syntax highlighting: Here you can select the desired script language. The following script languages are available:
- Apache
- Bash
- C#
- C++
- CSS
- Diff
- HTML
- HTTP
- Ini
- JSON
- Java
- JavaScript
- Markdown
- Nginx
- Perl
- PHP
- PowerShell
- Python
- Ruby
- SCSS
- SQL
- Twig
- YAML
- XML
code: Here you can enter the desired code. Note that the code will not be executed.
Template settings
Content element template: Here you can overwrite content element ce_code template.
HTML Output
The element generates the following HTML code:
<div class="ce_code block">
    <pre>
        <code class="hljs css">…</code>
    </pre>
</div>
Content element template: Here you can overwrite the content element content_element/code template.
HTML Output
The element generates the following HTML code:
<div class="content-code">
    <pre>
        <code class="hljs css">…</code>
    </pre>
</div>
Description list
This feature is available in Contao 5.3 and later.
The “Description list” content element adds a description list to the article; this is often used to implement a glossary or to display metadata (a list of key-value pairs).
You can add a list of terms and details to the description list. If you leave the field for the term empty, you can create multiple details for a term.

List items
Description list items: You can add a list of terms and details to the description list. If you leave the field for the term empty, you can create multiple details for a term.
Template settings
Content element template: Here you can overwrite the content element content_element/description_list template.
HTML Output
The element generates the following HTML code:
<div class="content-description-list">
    <dl>
        <dt>…</dt>
        <dd>…</dd>
    </dl>
</div>
Heading
The content element “Heading” adds a heading to the article. Most content elements support entering a heading directly, so you don’t have to use the element separately each time.
heading: Here you can enter the heading.
With the select menu to the right you can define the semantic hierarchy of this heading. The most important headline of
the page is shown as h1 (usually only one per page), while the values h2 up to h6 create hierarchically lower
headlines and of course can occur several times on a page.
Template settings
Content element template: Here you can overwrite the content element ce_headline template.
HTML Output
The element generates the following HTML code:
<h1 class="ce_headline">…</h1>
Content element template: Here you can overwrite the content element content_element/headline template.
HTML Output
The element generates the following HTML code:
<h1 class="content-headline">…</h1>
HTML
The content element “HTML” adds arbitrary HTML code to the article. Note that not all HTML tags are allowed by default. The list of allowed tags can be configured in the backend settings.
Text/HTML/Code
HTML code: Here you can enter the HTML code.
Template settings
Content element template: Here you can overwrite the content element ce_html template.
Content element template: Here you can overwrite the content element content_element/html template.
The content element has no enclosing HTML markup.
List
The content element “List” adds a non-nested list to the article. You can choose between an ordered list and an unordered list enumeration. A JavaScript assistant supports you in creating and editing the list items.
With a click on the icon next ![]() to
the field name “List entries” you open the CSV import wizard, with which you can import list data from a CSV file. The
CSV file must have been transferred to the upload directory before.
to
the field name “List entries” you open the CSV import wizard, with which you can import list data from a CSV file. The
CSV file must have been transferred to the upload directory before.
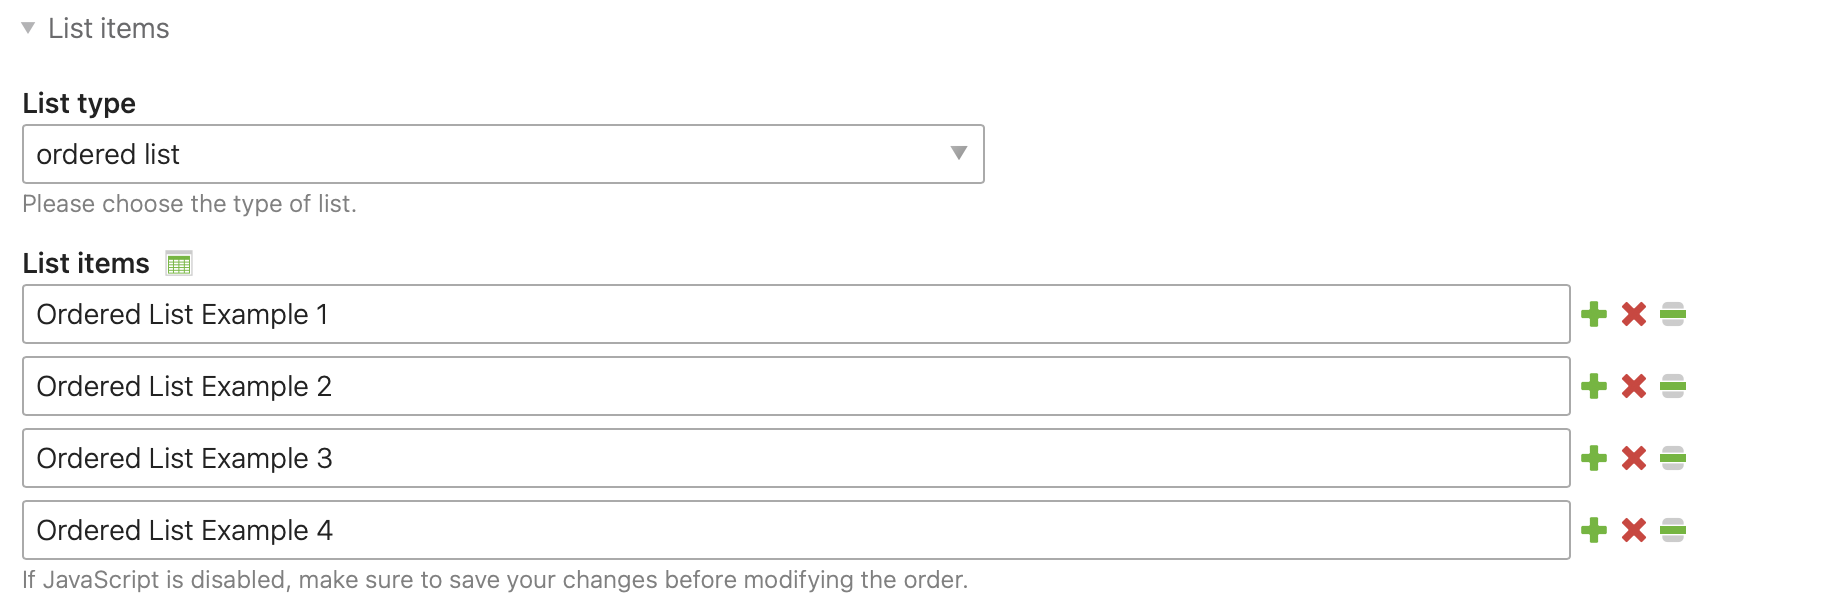
List items
List type: Please choose between a ordered or unordered list.
List items: Enter an entry in the list.
Template settings
Content element template: Here you can overwrite the content element ce_list template.
HTML Output The element generates the following HTML code:
<div class="ce_list block">
    <ul>
        <li class="first">…</li>
        <li>…</li>
        <li class="last">…</li>
    </ul>
</div>
Content element template: Here you can overwrite the content element content_element/list template.
HTML Output The element generates the following HTML code:
<div class="content-list">
    <ul>
        <li>…</li>
        <li>…</li>
        <li>…</li>
    </ul>
</div>
A numbered enumeration uses the <ol> tag instead of the <ul> tag.
Markdown
The content element “Markdown” is used to generate HTML code from a markdown text.
Text/HTML/Code
Markdown source: Please choose the Markdown source.
| Markdown source | |
|---|---|
| Text: | Here you can enter the desired markdown code. |
| File: | since 4.12 Here you can select a Markdown file and use it as content. |
Code: Note that the code will not be executed.
Template settings
Content element template: Here you can ce_markdown overwrite the content element template.
HTML Output
The element generates the following HTML code:
<div class="ce_markdown block">
    <div>
        <h1>…</h1>
        <p>…</p>
    </div>
</div>
Content element template: Here you can content_element/markdown overwrite the content element template.
HTML Output
The element generates the following HTML code:
<div class="content-markdown">
    <h1>…</h1>
    <p>…</p>
</div>
Below are some examples of Markdown syntax:
Table
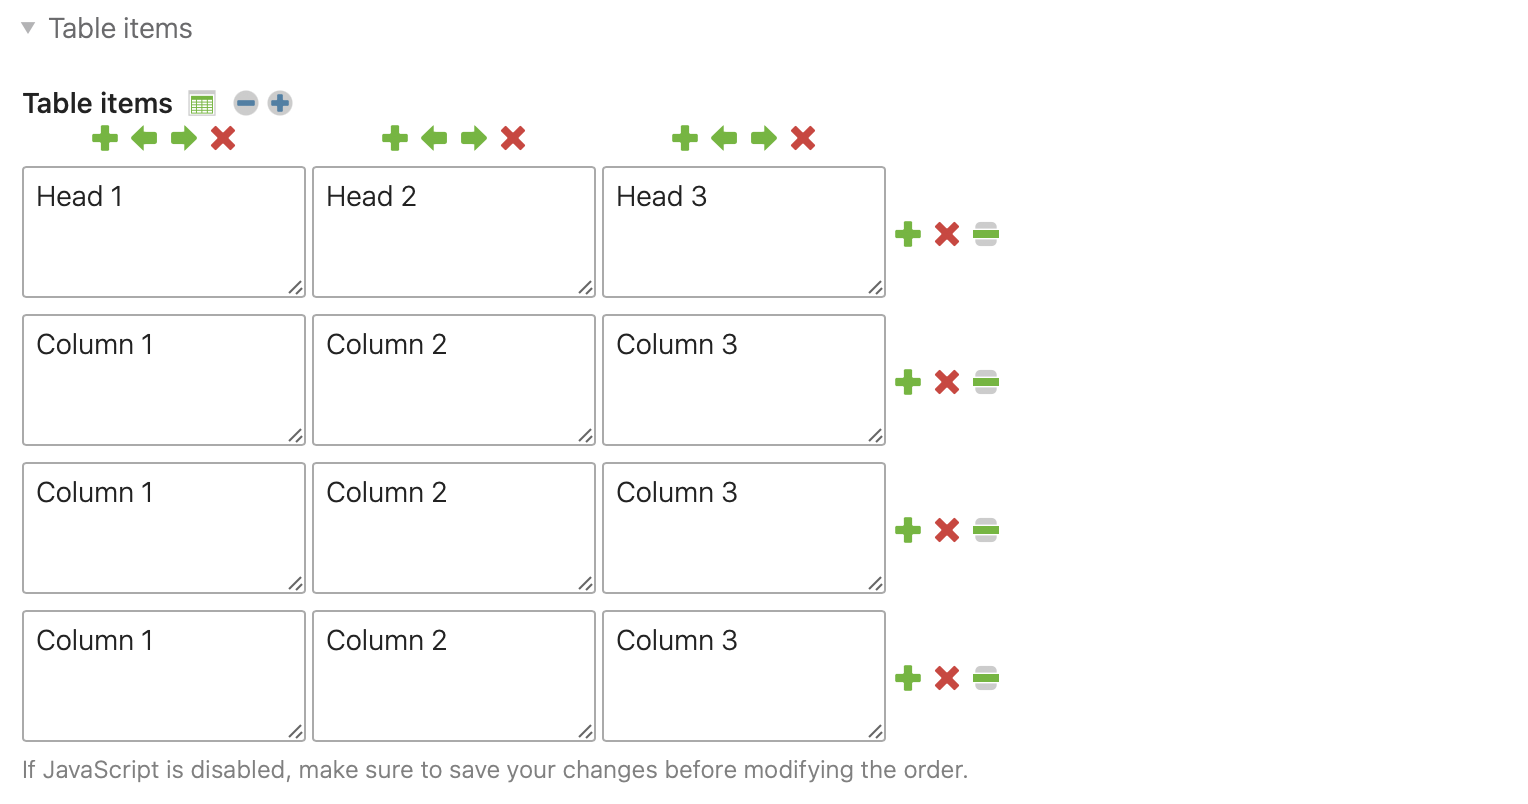
The content element “Table” adds a table to the article. A JavaScript assistant supports you in creating the rows and columns. You can edit the table with the following navigation icons:
 Reduce the size of the input fields
 Enlarge the input fields
 Duplicate the column/row
 Move the column one position to the left
 Move the column one position to the right
 Delete the column/row
 Move the row by dragging and dropping it
With a click on the icon next ![]() to
the field label “Table entries” you open the CSV import wizard, with which you can import table data from a CSV file.
The CSV file has to be transferred to the upload directory first.
to
the field label “Table entries” you open the CSV import wizard, with which you can import table data from a CSV file.
The CSV file has to be transferred to the upload directory first.
Table configuration
Table summary: An accessible website should contain a short summary of the content of each table, which you can enter here.
Add table header: If you select this option, the first row of the table is formatted as a header using the tag
<thead>.
Add table footer: If you select this option, the last row of the table is formatted as a footer using the tag
<tfoot>.
Use row headers: If you select this option, the first column of the table is formatted as a row header using the
tag <th>.
Sorting options
Sortable table: Makes the table sortable in the frontend using JavaScript. The j_tablesort template must be
included in the page layout.
Sort index: The number of the column to be sorted by default, as long as the visitor has not made a selection. The count starts at 0.
Sort order: The order of the default sort (ascending or descending).
Template settings
Content element template: Here you can overwrite the content element ce_table template.
HTML Output
The element generates the following HTML code:
<div class="ce_table block">
    <table class="sortable" data-sort-default="0|asc">
    <caption>…</caption>

    <thead>
        <tr>
            <th class="head_0 col_first unsortable">…</th>
            <th class="head_1">…</th>
            <th class="head_2">…</th>
            <th class="head_3 col_last">…</th>
        </tr>
    </thead>

    <tfoot>
        <tr>
            <td class="foot_0 col_first">…</td>
            <td class="foot_1">…</td>
            <td class="foot_2">…</td>
            <td class="foot_3 col_last">…</td>
        </tr>
    </tfoot>

    <tbody>
        <tr class="row_0 row_first odd">
            <th scope="row" class="col_0 col_first">…</th>
            <td class="col_1">…</td>
            <td class="col_2">…</td>
            <td class="col_3 col_last">…</td>
        </tr>
        <tr class="row_1 row_last even">
            <th scope="row" class="col_0 col_first">…</th>
            <td class="col_1">…</td>
            <td class="col_2">…</td>
            <td class="col_3 col_last">…</td>
        </tr>
    </tbody>

    </table>
</div>
Content element template: Here you can overwrite the content element content_element/table template.
HTML Output
The element generates the following HTML code:
<div class="content-table">
<table data-sortable-table="{"descending":false}">
<caption>…</caption>
<thead>
<tr>
<th data-sort-method="none" role="columnheader">…</th>
<th role="columnheader">…</th>
<th role="columnheader">…</th>
<th role="columnheader">…</th>
</tr>
</thead>
<tfoot>
<tr>
<td>…</td>
<td>…</td>
<td>…</td>
<td>…</td>
</tr>
</tfoot>
<tbody>
<tr >
<th scope="row">…</th>
<td>…</td>
<td>…</td>
<td>…</td>
</tr>
<tr>
<th scope="row">…</th>
<td>…</td>
<td>…</td>
<td>…</td>
</tr>
</tbody>
</table>
</div>
Text
The content element “Text” adds formatted text to the article. The input takes place via a so-called Rich Text Editor, which allows you to apply some formatting, similar to a word processing program. Contao uses TinyMCE, an Open Source editor by the Swedish company Moxiecode that can be easily adapted to the requirements of accessibility.

Heading: Here you can enter a headline.
With the select menu to the right you can define the semantic hierarchy of this heading. The most important headline of
the page is shown as h1 (usually only one per page), while the values h2 up to h6 create hierarchically lower
headlines and of course can occur several times on a page.
Text/HTML/Code
text: Here you enter the text of the content element.
Image settings
Add an image
You can add an image to the text element, which is then surrounded by your text. The following options are available:
Source file: Here you select the image to be inserted. If you have not yet transferred the image to the server, you can upload it here without leaving the input mask.
Full-size view/new window: If this option is selected, the image will be opened in its original size when clicked. This option is not available for linked images.
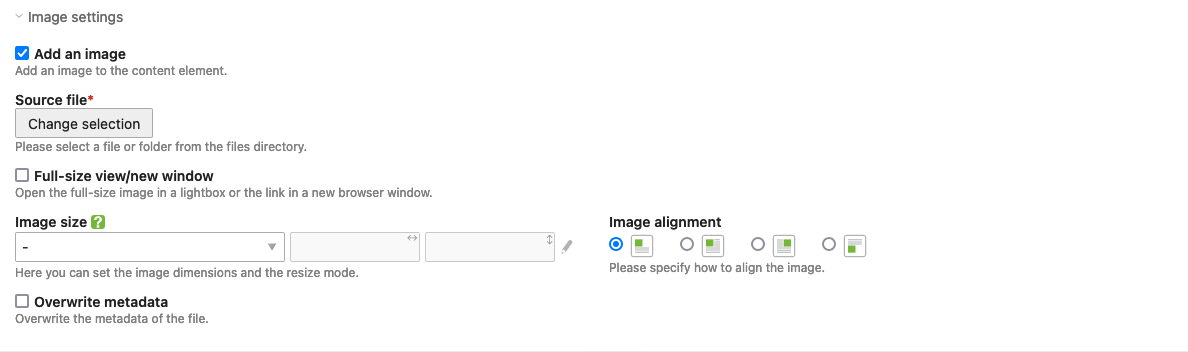
Image size: Here you can specify the desired image size. You can choose between the following scaling modes:
| Custom dimensions | |
|---|---|
| Crop (important part) | Preserves the important part of an image as specified in the file manager. If necessary, the image will be cropped. |
| Proportional | The longer side of the image is adjusted to the given dimensions and the image is resized proportionally. |
| Fit the box | The shorter side of the image is adjusted to the given dimensions and the image is resized proportionally. |
Image alignment: Here you can set the alignment of the image. If it is inserted
![]() above,
above,
![]() below,
below,
![]() left-aligned or
left-aligned or
![]() right-aligned. When left- or right-aligned,
the text flows around the image (as symbolized by the icon).
right-aligned. When left- or right-aligned,
the text flows around the image (as symbolized by the icon).
Overwrite metadata: Here you can overwrite the metadata from the file manager.
Alternate text: Here you can enter an alternative text for the image (alt attribute). Accessible web pages should contain a short description for each object, which is displayed if the object itself cannot be displayed. Alternative texts are also evaluated by search engines and are therefore an important tool for onpage optimization.
Image title: Here you can enter the title of the image (title attribute).
Image link target: When you click on a linked image, you will be redirected to the specified destination page (corresponds to an image link). Please note that a lightbox large view is no longer possible for a linked image.
Image caption: Here you can enter a caption.
Template settings
Content element template: Here you can overwrite the content element ce_text template.
HTML Output The element generates the following HTML code:
<div class="ce_text block">
    <h2>…</h2>
    <p>…</p>
</div>
If an image was added to the text, the HTML output looks like this:
<div class="ce_text block">
    <h2>…</h2>
    <figure class="image_container float_above">
        <img src="…" alt="…" itemprop="image">
        <figcaption class="caption">…</figcaption>
    </figure>
    <p>…</p>
</div>
Content element template: Here you can overwrite the content element content_element/text template.
HTML Output The element generates the following HTML code:
<div class="content-text">
    <h2>…</h2>
    <div class="rte">
        <p>…</p>
    </div>
</div>
If an image was added to the text, the HTML output looks like this:
<div class="media media--above content-text">
    <h2>…</h2>
    <figure>
        <img src="…" alt="…">
        <figcaption>…</figcaption>
    </figure>
    <div class="rte">
        <p>…</p>
    </div>
</div>
Unfiltered HTML
This feature is available in Contao 5.3 and later.
The content element “Unfiltered HTML” adds unfiltered HTML to the article. Please be careful when you insert things that you do not understand. This could allow attackers to steal your identity or take take control of the entire system.
Template settings
Content element template: Here you can overwrite the content element content_element/unfiltered_html template.
The content element has no enclosing HTML markup.