Internal redirect
A page of this type redirects visitors to another page in the page structure. The target page must be accessible under the same domain as the redirection page, otherwise an external redirection must be used.
Name and type
Page name: The page name is displayed in the navigation and used as a fallback for the page title.
Page type: Here you can define the type of page.
Routing
Page aliases: The alias of a page is a unique and meaningful reference that you can use to access a page in your browser. If you leave this field empty when creating a page, Contao will automatically generate the alias.
Route path: The preview of the final path (possibly with placeholders) to match this page.
Route priority: Optionally configure the priority to affect the order of routes.
Metadata
The metadata of a page mostly refers to the corresponding meta tags in the header area of the HTML page. You can use them to define the title and description of a page, among other things.
Page title: The page title is used in the <title> tag of the website and often appears in search results of
Google and Co. It should not contain more than 65 characters, because many search engines will simply cut off longer
titles. If no page title is defined, the page name is used as a fallback.
Output in source code:
<title>Contao Open Source CMS</title>
Robots tag: The robots tag defines how search engines treat a page.
- index: add the page to the search index
- follow: follow the links on the page
- noindex: do not include the page in the search index
- nofollow: do not follow the links on the page
The default case is index,follow, because we want Google and other search engines to include our pages in the search index. However, certain pages, such as the imprint or the registration page, can be excluded from indexing using the setting noindex,nofollow.
Output in source code:
<meta name="robots" content="index,follow">
Redirecting
Redirect page: Here you specify the target page for internal redirects.
Redirect type: Here you can specify whether the redirect is temporary (HTTP 302) or permanent (HTTP 301). The redirection type is especially important for search engine optimization.
Always redirect: The redirection to the target page also takes place if query or path parameters are present.
Access protection
In contrast to access rights, which define the rights in the back end, access protection refers to the protection of a page from access in the front end. Visitors must first log in with their username and password before they can access the page. Otherwise they would only see an error page.
Protect page: Here you can restrict access to a page. If you do not select this option, access protection is inherited from a parent page.
Allowed member groups: Here you can define which member groups are allowed to access the page. To configure members and member groups, see the System Administration page.
Layout settings
A page layout is a prerequisite for Contao to be able to display a page in the front end at all. If no page layout has been assigned or inherited, Contao will show an error saying “No layout specified” in the front end.
Assign a layout: Here you can assign a page layout to a page. The assignment automatically applies to all sub pages without a page layout.
Page layout: Here you can see all available page layouts grouped by themes. You activate a theme by assigning a page layout.
Subpage layout: With the selection of »Inherit page layout« (default) the assignment of the page layout also applies to all sub pages without their own page layout. Alternatively, a separate, different page layout for sub pages can be assigned here.
Cache settings
In the cache settings you can define if and how long a page should be cached. Cached pages load much faster because they do not have to be generated by Contao and they do not need a connection to the database for delivery.
Set cache timeouts: Here you can assign a cache time to a page. If you do not select this option, the cache settings are inherited from a parent page.
Private cache timeout (Client cache timeout): Allows you to assign a cache time to a page. This sets the time in seconds after which the browser will consider the page out of date.
Shared cache timeout (Server cache timeout): Here you can assign a cache time to a page. This defines the time in seconds after which the page is considered obsolete by a shared cache.
Note that for security reasons, pages are only cached if they are not protected and no user is logged on to the back end. Otherwise, there is a risk that confidential data is written to the cache and accidentally displayed in the front end. So don’t be surprised if your password-protected pages don’t show up in the cache despite their assigned expiration time.
Always load from shared cache: Always load this page from the shared cache, even if a member is logged in. Note that in this case you will not be able to personalize the page for logged in members.
Access rights
Via access rights you define which users in the back end (!) are allowed to access a page and what they can do with this page and the articles it contains. Similar to the Unix permissions system, each page belongs to a specific user and user group and has three levels of access:
- Access as owner of a page
- Access as member of the group of a page
- Access as any other back end user
For example, the “Company” page is assigned access rights and belongs to the user h.lewis and the user group News. Both the user and everyone in the user group can edit articles on the page, but only the owner, h.lewis, and you the administrator can edit the page and change its title.
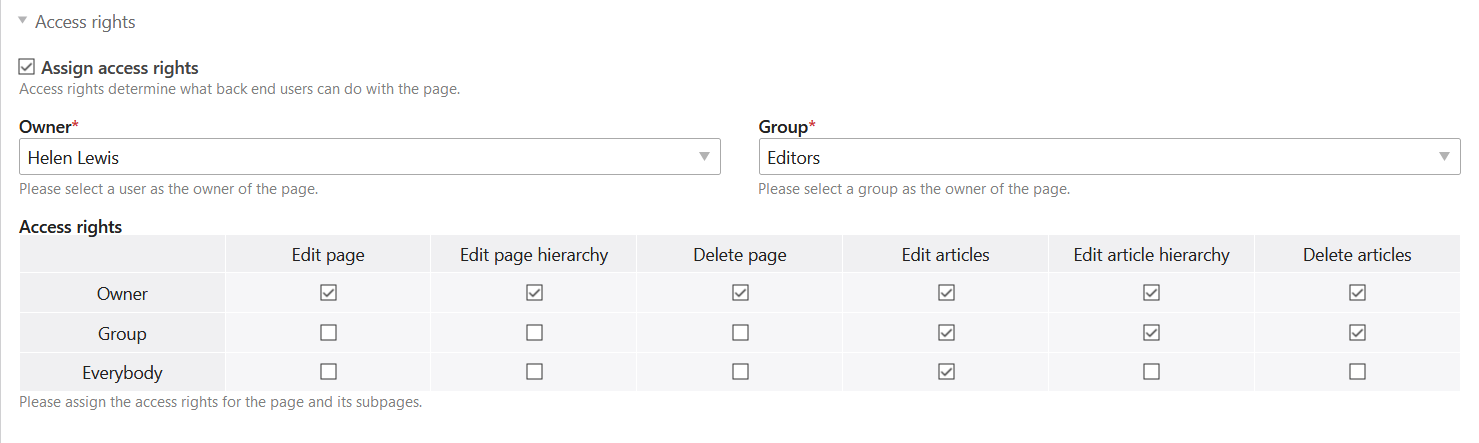
Assign access rights: Here you can assign access rights to a page. If you do not select this option, the access rights will be inherited from a parent page.
Owner: Here you can set the owner of the page.
Group: Here you define the group of the page.
Access rights: Here you assign the rights to the individual access levels.
For more information on the permissions system and the configuration of users and user groups, see the system settings page.
Expert settings
CSS class: Here you assign a CSS class to the page, which is used in the body tag of the HTML page as well as in the navigation modules. This way you can create CSS formatting for a specific page or menu item.
Show in HTML sitemap: Here you can determine whether the page is displayed in the HTML Sitemap. By default, all public pages and pages not hidden in the menu are included. If necessary, this behavior can be adjusted per page:
- Default: Use the default settings.
- Always display: The page is always displayed in the HTML Sitemap, even if, for example, it is hidden in the menu and would not normally be displayed.
- Never display: The page is excluded from the HTML Sitemap.
Do not confuse the HTML sitemap with the XML sitemap: The HTML sitemap is a FE-Module, you can submit the XML sitemap e.g. to Google.
Hide in menu: If you select this option, the page will not be displayed in the menu of your website, but you can still access the page - if it has been published - via a direct link or in a front end module.
Keyboard navigation
From section Back end shortcuts you already know that Contao supports navigation using shortcuts. This not only has a positive effect on accessibility but also speeds up the workflow. For this reason, the feature is also available in the front end and each page can optionally be provided with a keyboard shortcut and a tab index.
Shortcut keys: A shortcut key is a single character associated with a page. Visitors to your site can then access that page directly from the keyboard. This function is especially required for accessible websites.
Publication
As long as a page is not published, it practically does not exist in the front end and cannot be accessed by visitors. In addition to manual publishing, Contao also offers the possibility to activate pages automatically on a specific date. This way you can, for example, apply for a limited time offer.
Publish page: Here you can publish a page.
Show from: Here you activate a page on a specific date.
Show until: Here you deactivate a page at a certain date.