Laragon
In this tutorial the setup of a local development environment under Windows is described using Laragon as an example.
With Laragon WAMP a local software stack consisting of the following server components is installed:
- Apache Web Server
- MySQL
- PHP
The installation package also includes other useful tools, which will not be discussed here, but you can find more information about Laragon (installation, features, etc.) in the official documentation.
1. System requirements
Windows 7, 8, 8.1, 10
This manual describes how to install Laragon on Windows 10 (64-bit).
2. Preparatory measures
The security concept of current Contao versions (specifically Contao 4.x and higher) requires that symbolic links (symlinks) have to be created for the proper operation of the web application. However, creating symlinks under Windows usually requires administrator rights. It is therefore recommended that the ordinary Windows user also be granted the appropriate right to create symlinks. The easiest way to do this is to use the free Polsedit tool. The ZIP archive contains both a 32-bit and 64-bit version of Polsedit and can be run directly without installation.
ToDo: Configure permission to create symbolic links in Group Policy
- Download Polsedit: https://www.southsoftware.com/polsedit.html
- Unpack ZIP archive
- For Windows 10 (64 bit): run
polseditx64.exe(64 bit version) - In the right pane, search for the policy “Create symbolic links” (
SE_CREATE_SYMBOLIC_LINK_NAME):
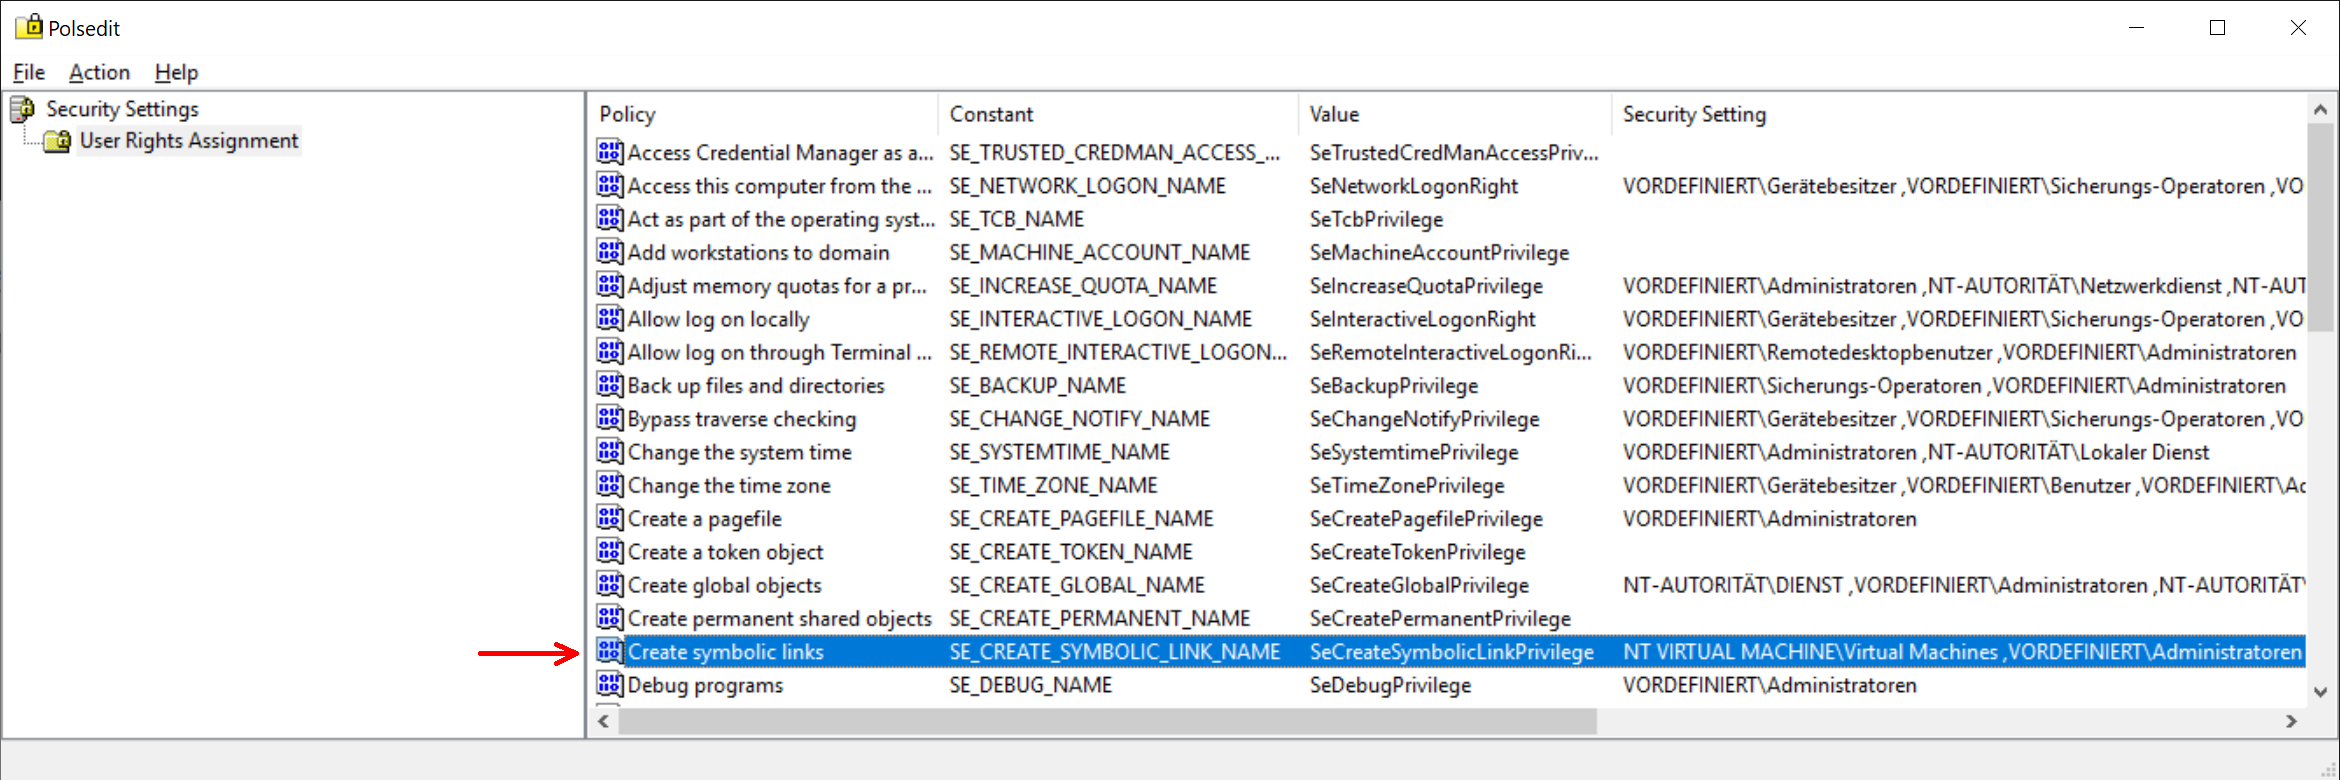
- Double-click on “Create symbolic links” to open the policy’s properties window:
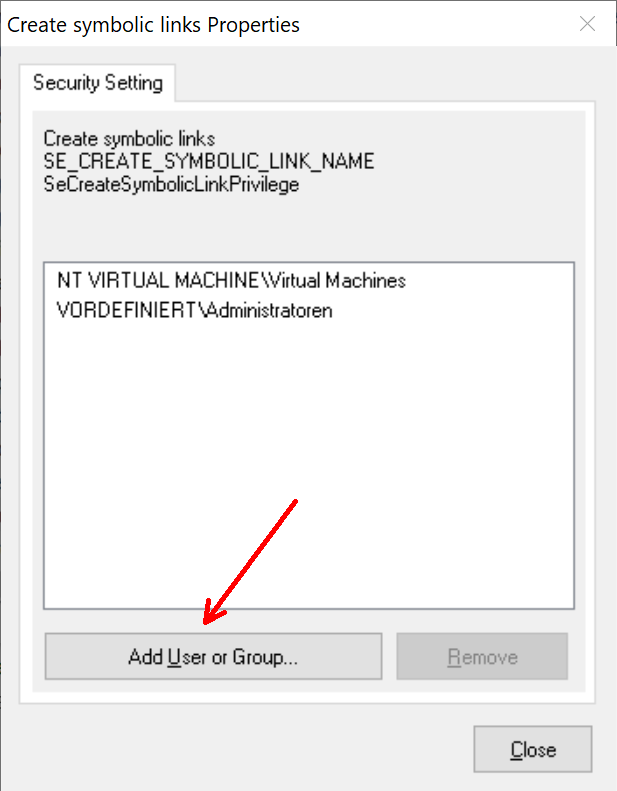
- Select your (current) Windows user in the list of user accounts via the button “Add User or Group…”
and click “OK” to confirm your selection. The Windows user should now also be listed in the policy properties (in addition to the existing user accounts). - Close the properties window and quit Polsedit.
- Log off/log on the user (or restart the system) so that the policy changes take effect.
3. Download and install Laragon
The installation of Laragon should be intuitive and largely self-explanatory via the guided installation process. The latest release of the WAMP stack can be downloaded directly from GitHub in the appropriate version.
ToDo: Download and install Laragon
- Download the latest release from the Laragon GitHub repository
- For Windows 10 (64-bit): download
laragon-wamp.exe(64-bit version) - Run the installation file
laragon-wamp.exe. Under certain circumstances, a message from the Windows Defender SmartScreen may appear at this point, indicating that the start of an unknown app has been prevented. However, the link “More Information” allows you to “Run anyway”. - The setup wizard will then guide you through the installation.
- In the dialog “Select destination folder” you can specify where Laragon should be installed (e. g. on another drive or partition).
- In the next dialog window, some configuration settings can already be specified, including the option to automatically create “virtual hosts”.
- At the end of the installation process there is the option to start Laragon automatically.
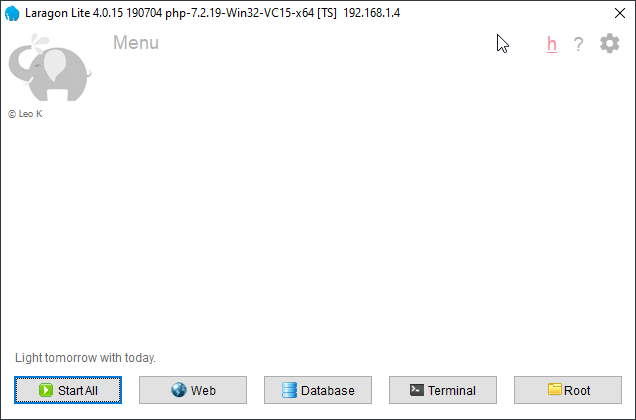
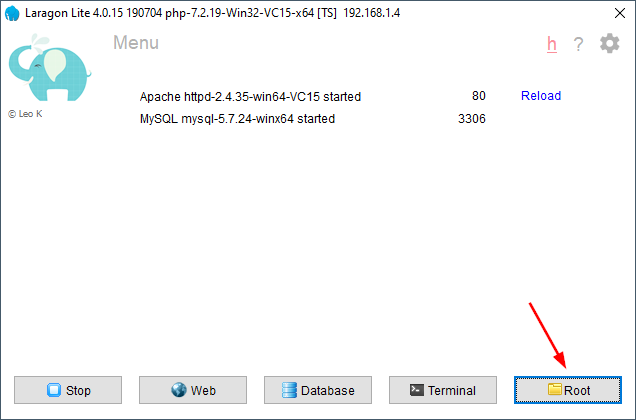
In the future, Laragon can be accessed via the corresponding new entry in the Windows Start menu or via the Laragon shortcut icon on the Windows desktop. After starting the application, a program icon appears in the Windows notification area (System Tray) that also displays the status of the services (started or stopped) and can be used to open the Laragon management panel:
4. Configure Laragon
Laragon can be adapted and configured relatively easily. For example, the “Create new website” feature can be used to completely automate the installation of a new Contao instance so that a fresh Contao installation can be set up with just a few clicks.
ToDo: Define settings in Laragon and configure apps
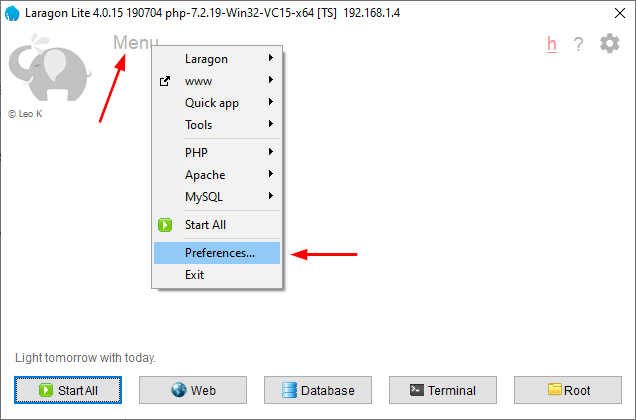
- Start Laragon
- In the Laragon management panel, click on “Menu” and then “Settings” (the menu can also be opened by right-clicking on a free space in the management panel):
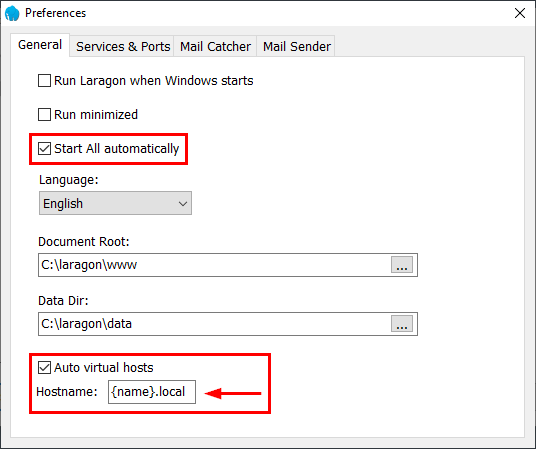
- In the “General” tab of the Laragon settings, enable the option “Start all services automatically” and for
the option “Create virtual hosts automatically” change the “host name” scheme as follows:
{name}.local
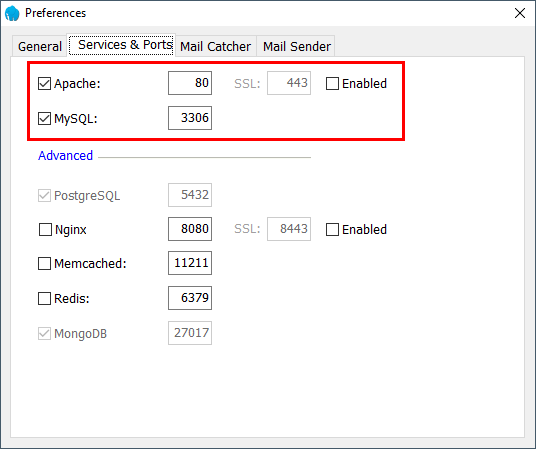
- In the “Services/Ports” tab of the Laragon settings, make sure that the two services “Apache” and “MySQL” are selected. If desired, you could also enable SSL support via port 443 here:
The Laragon configuration settings are stored in the file laragon\usr\laragon.ini and can of course be changed
there as well.
- Use “Menu” > “Laragon” > “laragon.ini” to open the Laragon configuration file for editing:

- In the section
[php]add the PHPsys_temp_dirvariable to the values of the keyQuickSettings:
QuickSettings=xdebug, max_execution_time, upload_max_filesize, post_max_size, memory_limit, sys_temp_dir
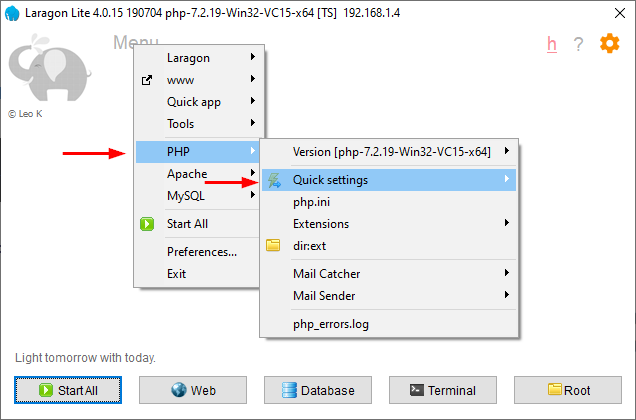
- Open the PHP quick settings via “Menu” > “PHP” > “Quick settings”:
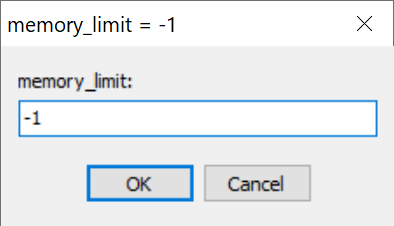
- Select the entry “memory_limit = …” from the submenu and set the PHP memory limit to the value
-1(or2G,4G):
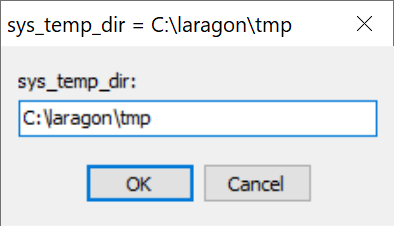
- In the same submenu, select the entry “sys_tempdir = …” and set the temporary directory to the
value
C:\laragon\tmp(adjust the Laragon root directory if necessary, if Laragon is not installed on the driveC:\under the default path):
- Via “Menu” > “PHP” > “PHP extensions” further PHP extensions can be easily activated or deactivated if required.
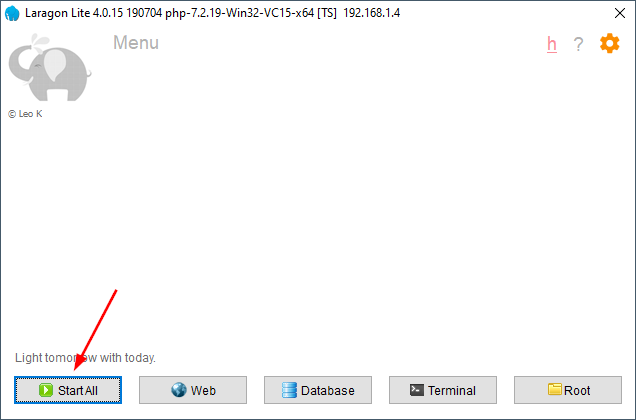
- The button “All services…” starts the web and database server:
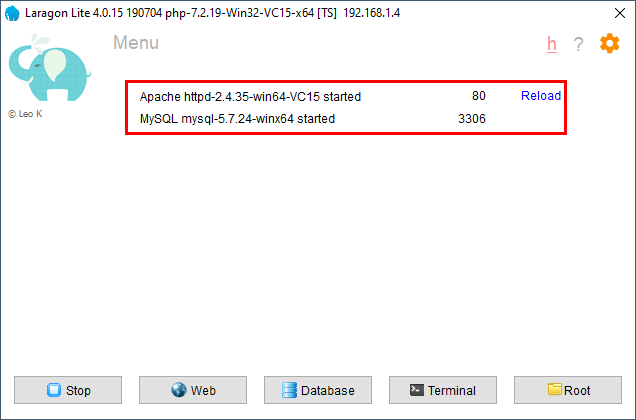
- At this point, the Windows Defender Firewall (or possibly another system firewall) will almost certainly report and prompt both the “Apache HTTP Server” and the MySQL server “mysqld.exe” to allow access to the local network. These two accesses must be granted for the further operation of the web and database server.
- If the servers are allowed to access the corresponding ports successfully, Laragon should show the two services “Apache” and “MySQL” as “started”:
- Now the local web server should be running and the Laragon index page should already be accessible via the web browser via http://localhost/:

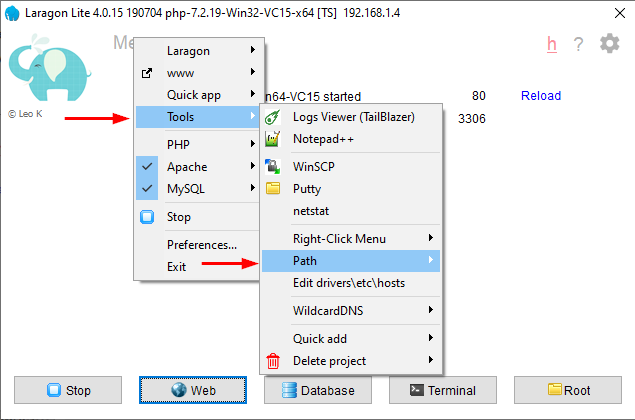
- In order to allow system-wide access to PHP (and all other Laragon tools/programs), the corresponding Laragon paths must be added to the Windows environment variable (PATH variable). The environment variables can be updated automatically via the Laragon management panel: “Menu” > “Tools” > “*Environment Variables” > “*Add Laragon to Path”:
In the same submenu, the Laragon environment variables can be removed if necessary. You can also use the menu item “Manage Path” to check if the path information has been added correctly to the PATH environment variable.
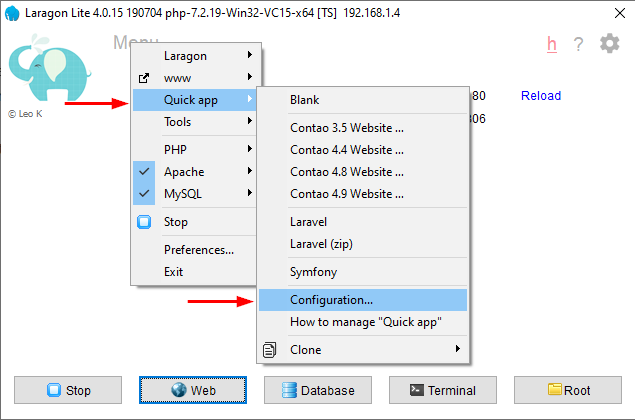
- Via “Menu” > “Create New Website”* > “Configuration…” the existing app configurations can be changed or supplemented accordingly:
The app configurations are saved to the file laragon\usr\sites.conf.
- In the configuration file
laragon\usr\sites.confthe contao-specific adjustments can now be added:
# Options
AutoCreateDatabase=true
Cached=true

# Blank: an empty project
Blank=

------------------------------------------------------

# Contao 3.5
Contao 3.5 Website …=composer create-project contao/core %s 3.5.*

# Contao 4.4 LTS
Contao 4.4 Website …=composer create-project contao/managed-edition %s 4.4.* && curl https://download.contao.org/contao-manager/stable/contao-manager.phar -o %s/web/contao-manager.phar.php

# Contao 4.9 LTS
Contao 4.9 Website …=composer create-project contao/managed-edition %s 4.9.* && curl https://download.contao.org/contao-manager/stable/contao-manager.phar -o %s/web/contao-manager.phar.php

------------------------------------------------------

# Wordpress
Wordpress=https://wordpress.org/latest.tar.gz

# Joomla
### Joomla=https://github.com/joomla/joomla-cms/releases/download/3.8.11/Joomla_3.8.11-Stable-Full_Package.tar.gz

# Prestashop
### Prestashop=https://github.com/PrestaShop/PrestaShop/releases/download/1.7.4.2/prestashop_1.7.4.2.zip

------------------------------------------------------

# Drupal
Drupal 8=https://ftp.drupal.org/files/projects/drupal-8.5.5.tar.gz
### Drupal 7=https://ftp.drupal.org/files/projects/drupal-7.59.tar.gz

------------------------------------------------------

# Laravel

Laravel=composer create-project laravel/laravel %s --prefer-dist

Laravel (zip)=https://github.com/leokhoa/quick-create-laravel/releases/download/5.6.21/laravel-5.6.21.7z

### Laravel dev-develop=composer create-project laravel/laravel %s dev-develop
### Laravel 4=composer create-project laravel/laravel  %s 4.2 --prefer-dist
### Lumen=composer create-project laravel/lumen  %s --prefer-dist

------------------------------------------------------

# CakePHP
### CakePHP=composer create-project --prefer-dist cakephp/app %s

# Symfony 4
Symfony=composer create-project symfony/website-skeleton %s
Of course, the app configurations of the other web applications can also be removed or commented out, as long as they are no longer needed.
Using the parameter AutoCreateDatabase in the section Options you can configure whether databases should also
be created automatically or not. By default, every newly created web project will also create a new, empty database
with the same name at the same time.
The changes in the laragon\usr\sites.conf are immediately active after saving; Laragon does not need to be restarted.
5. Install Composer globally
Although Laragon already comes with Composer, it may be necessary to install the PHP dependency manager globally on the system.
ToDo: Install Composer globally
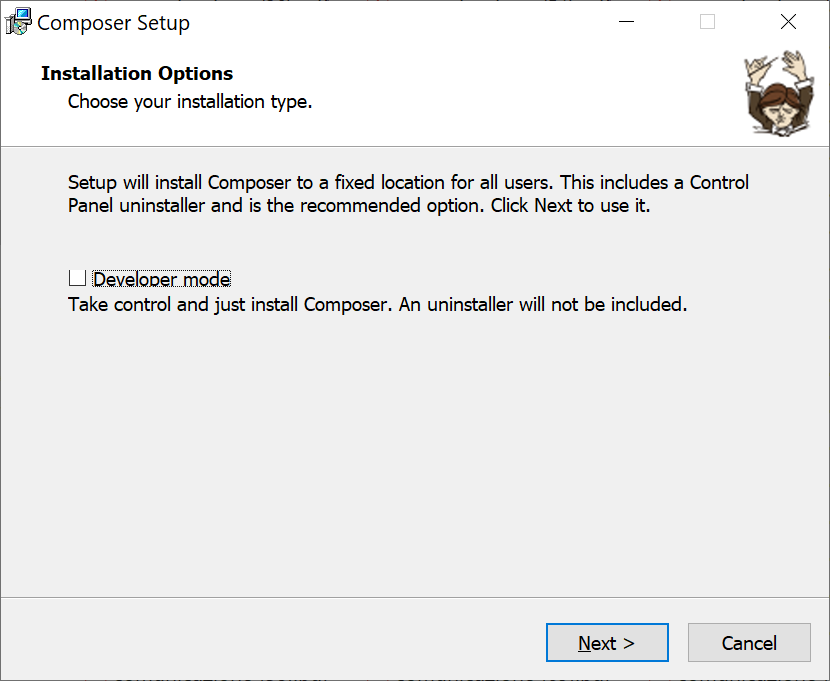
- Download the Composer Windows installer: https://getcomposer.org/Composer-Setup.exe
- Run the installation file
Composer-Setup.exeand follow the guided installation process in the setup wizard:
- The Composer Setup Wizard
php.exeshould be able to determine the path to automatically, provided the Laragon Paths have been added to the Windows PATH environment variable as specified above. - The Composer Windows Installer also updates the Windows PATH environment variable to make Composer available and accessible system-wide.
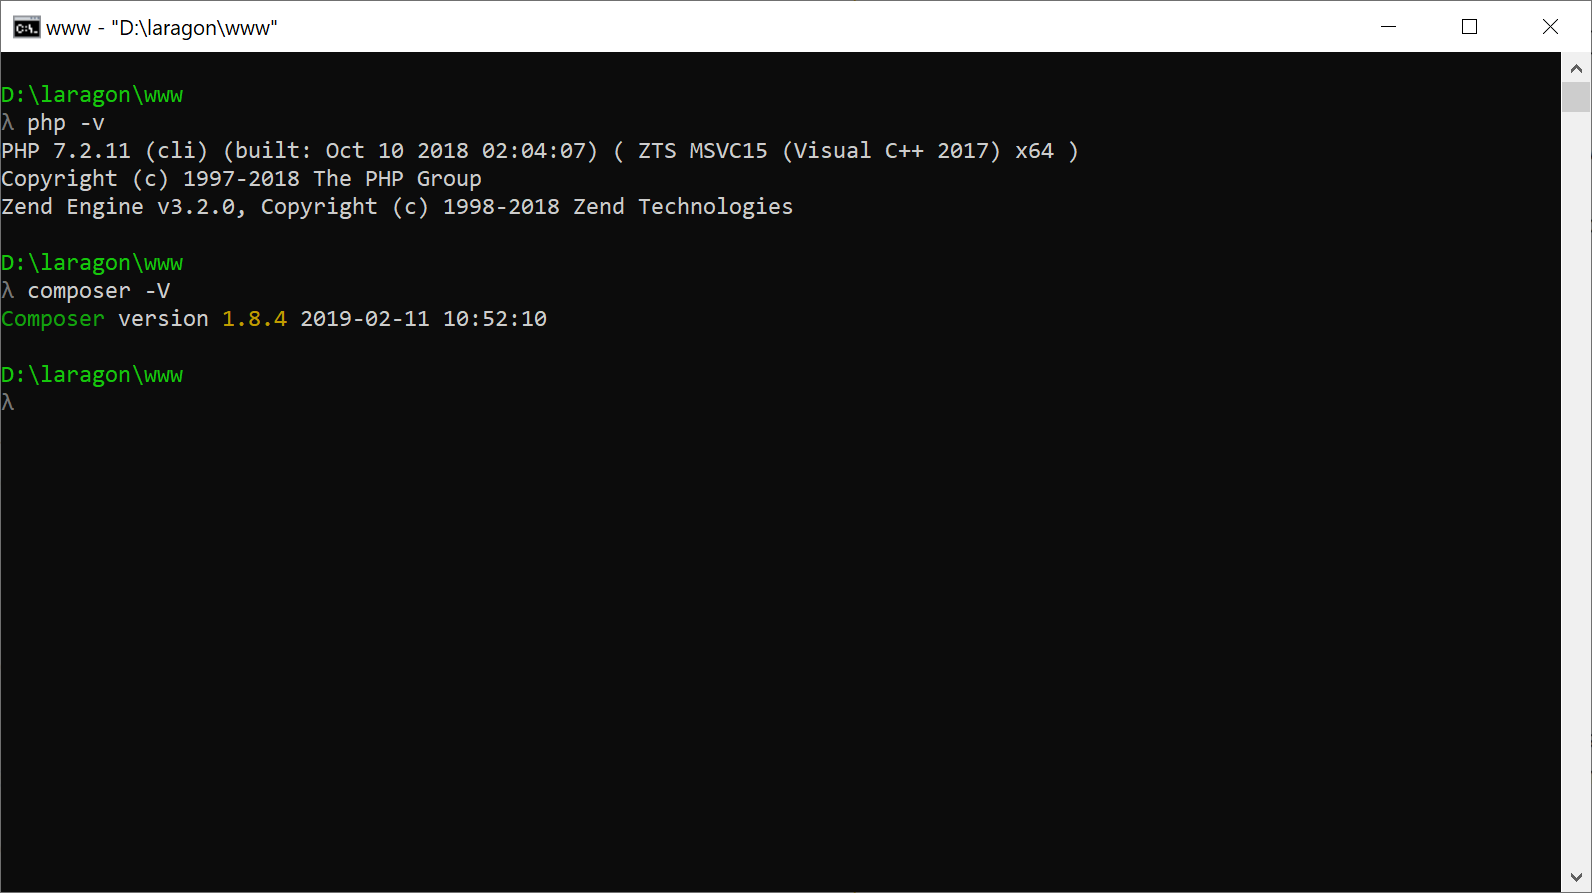
- For testing purposes, you could
laragon\wwwnavigate to the Laragon directory in Windows Explorer, right-click on it to start the “Console” and, for examplephp -v, execute andcomposer -Vrun it:
6. Install Contao
As mentioned before, the Laragon feature “Create a new website” allows you to create a new website based on any version of Contao relatively quickly and with just a few clicks. Laragon will automatically create the empty database and configure the virtual host.
ToDo: Set up a new Contao installation
- Start Laragon
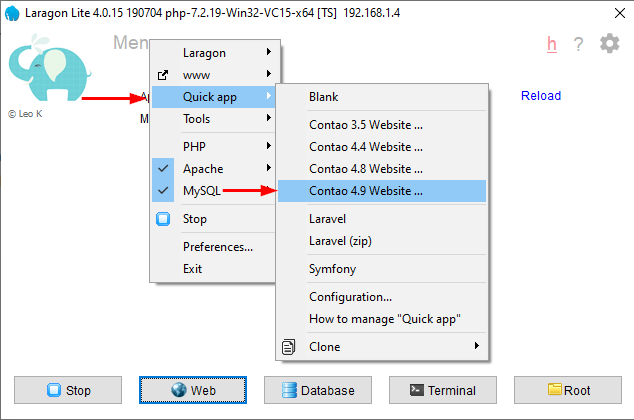
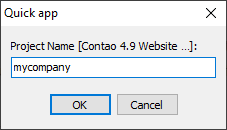
- The goal is to create a sample website “mycompany” that runs with Contao 4.9.
- Open “Menu” > “Create new website” in the Laragon Management Panel (or alternatively right-click the Laragon tray icon in the Laragon Management Panel) and select the entry “Contao 4.9 Website …”:
- Enter the project name of the example website
mycompanyin the input field (if possible, the project name should not contain any special characters, because it is also used as database name) and confirm with “OK”:
- A console window opens: In the background, Contao 4.9 (including all required packages) is installed via Composer.
Afterwards, the Contao Manager script is downloaded and saved in the subfolder
web/ascontao-manager.phar.php. - Laragon also automatically creates a database of the same name “mycompany” and a virtual host
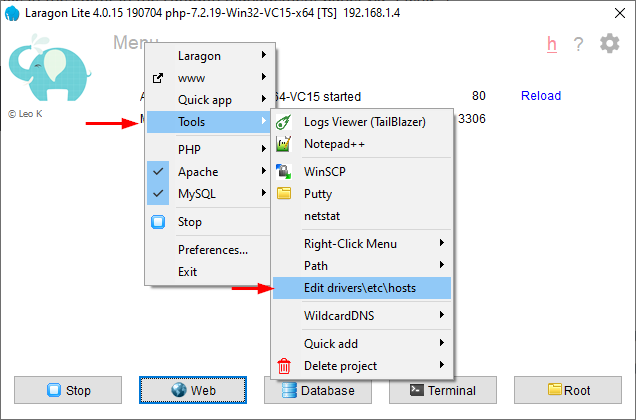
mycompany.local - For the virtual host, the Windows hosts file must also be updated. Therefore, depending on the Windows User Account Control (UAC) configuration, you may be prompted to confirm the changes to the system file after installation is complete. In addition, a message from the anti-virus software (or other security software) may indicate that access to the Windows hosts file is blocked for security reasons. If this is indeed the case, you would first have to temporarily disable the corresponding setting in the security software and then manually add the entry in the Windows hosts file. To do this, open the Hosts file in the editor in the Laragon management panel via “Menu” > “Tools” > “Edit drivers\etc\hosts” and add a new line
127.0.0.1 mycompany.local #laragon magic!
in addition:
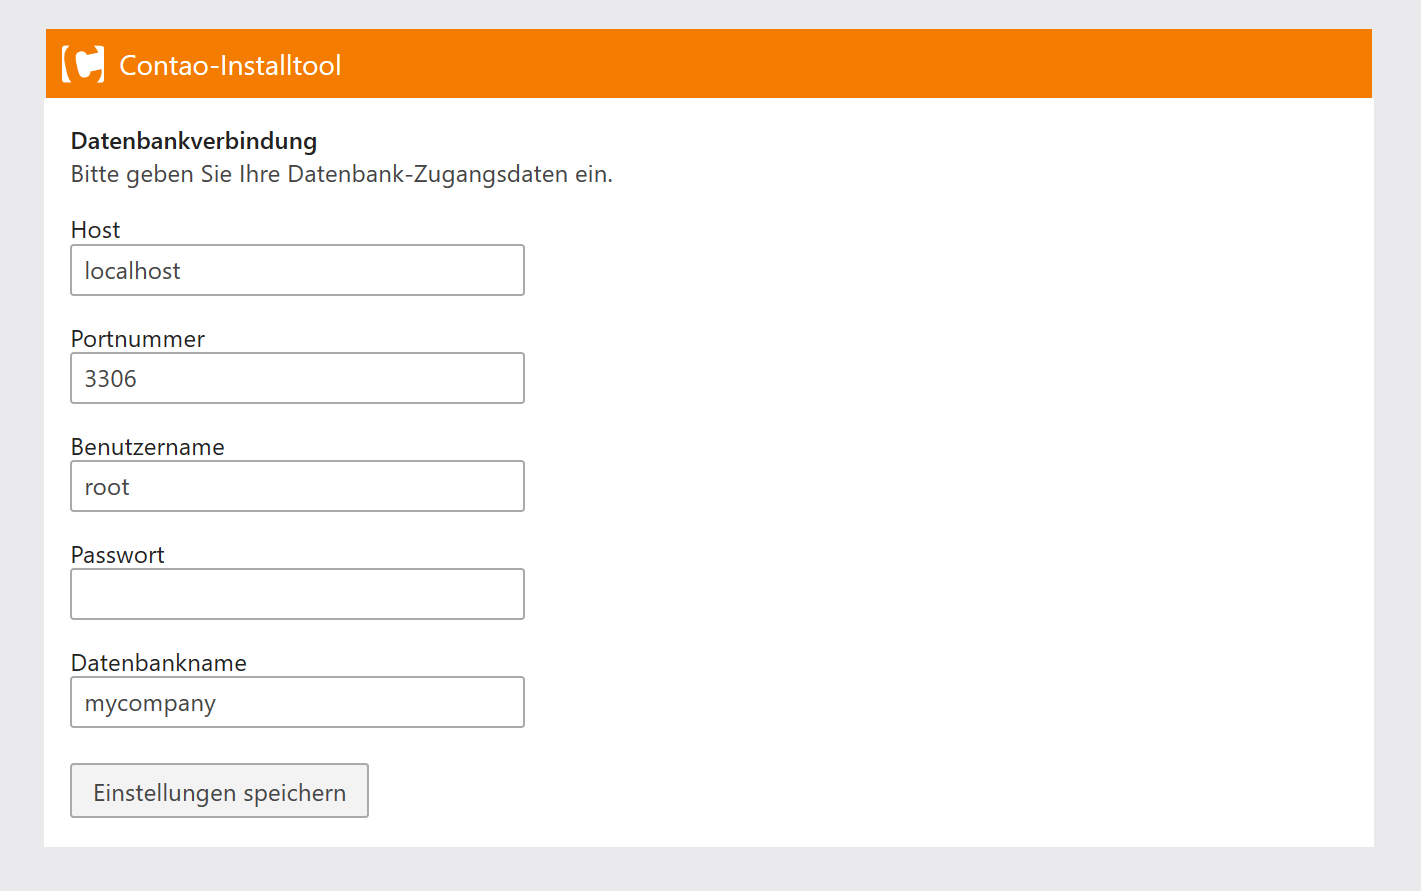
- If the new virtual host is configured correctly, you should now be able to launch the
Contao install tool via
http://mycompany.local/contao/install. - After confirming the license terms, you first set the password of the Contao installation tool as usual and then enter the database access data in the corresponding fields. By default, the DB user name is root, the DB password field remains empty (if no password has been set) and the project name (i.e. mycompany) is entered for the database name:
- If Contao can successfully connect to the specified database, the database will be updated immediately afterwards by generating all necessary tables and the database structure.
- At the end of the installation process, an administrator account is created for the Contao back end.
- The Contao front and back end, the Contao installation tool and the Contao Manager should now be accessible via the following URLs:
Contao front end: http://mycompany.local/
Contao back end: http://mycompany.local/contao (or http://mycompany.local/contao/login)
Contao installation tool: http://mycompany.local/contao/install
Contao Manager: http://mycompany.local/contao-manager.phar.php
(The system check of the Contao Manager should automatically detect the path to the PHP binary if a manual configuration is selected in
the server configuration via “Other …”)
If the browser software performs a web search for this keyword when entering, for example, contrary mycompany.local
to expectations, the schema or network protocol http:// should also be specified when calling, i.e. http://mycompany.local/.
Addendum
Appendix with further information/tasks:
Update Laragon
ToDo: Install the latest version of Laragon
- First stop all running services (Apache, MySQL) and close Laragon.
- Download the latest version of the Laragon executable from the GitHub Master branch
- Replace the existing
laragon.exeone in the Laragon installation directory with the previously downloaded executable. - Start Laragon.
Delete project
ToDo: Remove an existing website project
- Open “Menu” > “Tools” > “Delete project” in the Laragon management panel and select the website project to be deleted from the submenu:
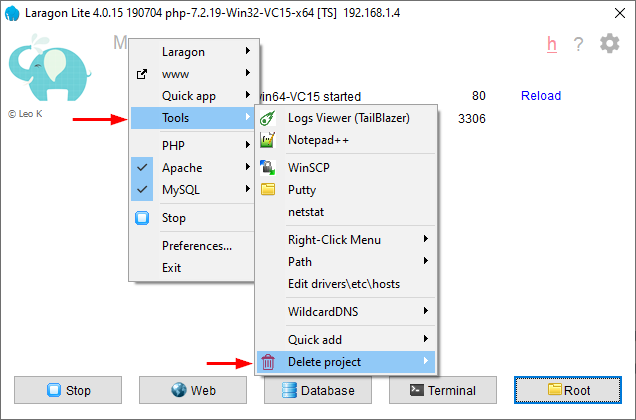
- In the next dialog box, Laragon will inform you that both the project folder and its associated database will be removed. These actions cannot be undone, i.e. the data will be irretrievably deleted. When you are aware of what you are doing, confirm the deletion.
Install Contao Official Demo (COD)
ToDo: Install Contao Official Demo
- In the Laragon Management Panel, click the “WWW Folder” button to open the Laragon www folder in Explorer:
- Open a new console window in the context menu of the website’s project folder (corresponds to the installation directory of the Contao installation) via “Console”.
- On the command line, execute the following command to install the Contao Official Demo (COD) via Composer
composer require contao/official-demo
Depending on the Contao version, it might be necessary to request the appropriate version of the Contao Official Demo (COD). For Contao 4.9, this would be the case:
composer require contao/official-demo:4.4.0
- Composer then performs a dependency resolution. If this is successful, the package is downloaded and installed in the system.
- Call the Contao install tool and import the SQL database dump of the Contao Official Demo (COD). Note: All data already in the database will be deleted when the COD dump is imported.
Like any other package/bundle, the Contao Official Demo (COD) can be installed in the same way via Contao Manager.
Database administration with phpMyAdmin
ToDo: Install phpMyAdmin
- Download phpMyAdmin from the official website: https://www.phpmyadmin.net/downloads/
- Unpack the ZIP archive and rename the folder
phpMyAdmin-x.x.x-all-languagesin phpMyAdmin (Attention: Please note that the folder name is case sensitive!) - Copy/move the folder
phpMyAdminincluding all files and subfolders tolaragon\etc\apps\. In the folderlaragon\etc\apps\phpMyAdmin\duplicate the example template of the phpMyAdmin configuration fileconfig.sample.inc.phpand rename the copy toconfig.inc.php. Edit the configuration fileconfig.inc.phpand adjust the settings as follows
/* Authentication type */
$cfg['Servers'][$i]['auth_type'] = 'cookie';
/* Server parameters */
$cfg['Servers'][$i]['host'] = 'localhost';
$cfg['Servers'][$i]['compress'] = false;
$cfg['Servers'][$i]['AllowNoPassword'] = true;
$cfg['Servers'][$i]['port'] = 3306;

$cfg['LoginCookieValidity'] = 36000;
http://localhost/phpmyadmincall phpMyAdmin via- Log in to phpMyAdmin:
- Username:
root - Password:
- Username:
The Apache alias configuration for phpMyAdmin is located in laragon\etc\apache2\alias\phpmyadmin.conf.
Additional PHP versions
Sometimes you need PHP 5.6 for older web projects, but you want to test new features with PHP 7.3. In the following, both PHP 5.6 and PHP 7.3 will be made available in Laragon.
ToDo: Add more PHP versions and switch between the different PHP versions
- Download the latest releases of PHP 5.6 and PHP 7.3 (currently
php-5.6.40-Win32-VC11-x64.zipandphp-7.3.2-Win32-VC15-x64.zip): https://windows.php.net/downloads/releases/ - Unpack the two ZIP archives of PHP 5.6 and PHP 7.3 in the folder
laragon\bin\phpinto the corresponding folders (php-5.6.40-Win32-VC11-x64orphp-7.3.2-Win32-VC15-x64). - After choosing the thread-safe (TS) variant for the two PHP versions, make sure that the compiler versions
of Visual C++ (VCxx) for the Apache web server and PHP match:
- PHP:
php-5.6.40-Win32-VC11-x64–> Apache: VC11httpd-2.4.38-win64- - PHP:
php-7.3.2-Win32-VC15-x64–> Apache: VC15httpd-2.4.35-win64-
- PHP:
- For PHP 7.3, the appropriate Apache version is already available. For PHP 5.6, the VC11 version of the Apache web server must be downloaded first.
- Download Apache 2.4 VC11 Windows Binary (
httpd-2.4.38-win64-VC11.zip): https://www.apachelounge.com/download/VC11/ - Unpack the ZIP archive for Apache 2.4 VC11 in the folder
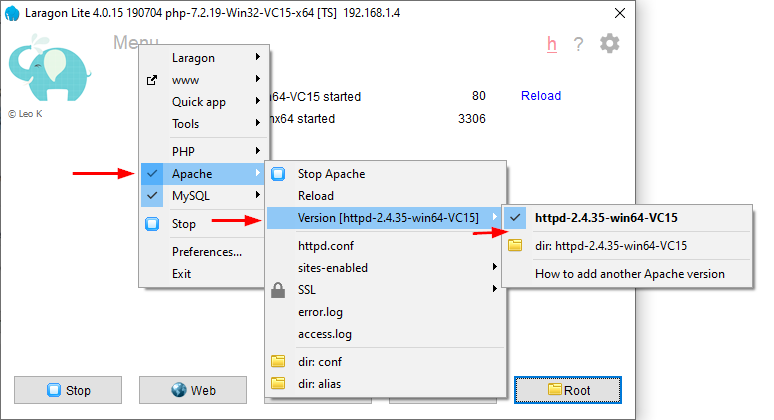
laragon\bin\apacheinto the corresponding folder (httpd-2.4.38-win64-VC11). The unpacked files and folders may have to be moved to match the given folder structure (seehttpd-2.4.35-win64-VC15). - Change PHP version:
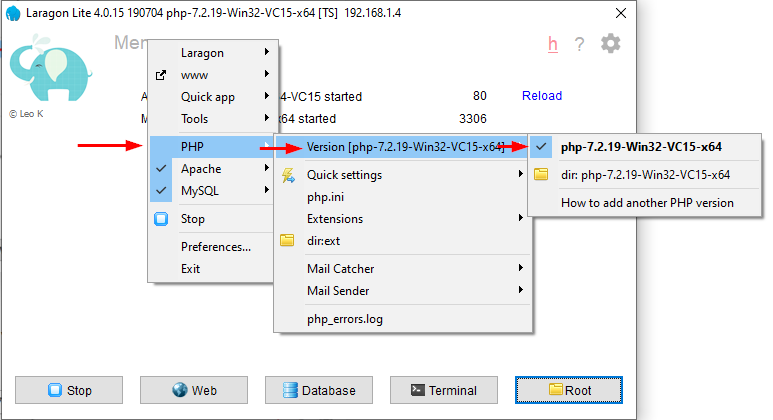
- Change Apache version:
Help
There is a thread in the Contao forum that deals with the installation and operation of Laragon or you can get advice in the Laragon forum DE or EN