FAQ management
The FAQ management is a separate module in the back end, which you can find in the group “Contents”. There you can create several categories, which contain the individual questions. By using multiple categories you can group FAQs by topic, language or website (multi-domain operation).
Categories
Categories are used to group FAQs. Each category can refer to a specific language or topic.
To create a new category click on New ![]() .
.
Title and forwarding
Title: The title of a category is only used in the backend overview.
Heading: The heading of a category is displayed in the frontend.
Forwarding page: Here you can define which page a visitor is forwarded to when clicking on a FAQ. The target page should contain the module “FAQ reader” to display the answer to the question.
Comments
You already know the Contao comment function from the “News/Blog” extension or the content element with the same name (Comments). It is also available for FAQs.
Enable comments: Here you can activate the comment function for the category.
Notification to: Here you determine whether the system administrator, the author of a question, or both are notified when new comments are posted.
Sorting: Here you define the order of the comments.
Comments per page: Here you can set the number of comments per page. Contao automatically creates a page break when it is needed.
Moderate comments: If you select this option, comments will not appear on the website immediately, but only after you have approved them in the back end.
Allow BBCode: If you select this option, your visitors can use BBCode to format their comments. The following tags are supported:
| Day | Explanation |
|---|---|
[b][/b] |
Boldface |
[i][/i] |
Italics |
[u][/u] |
Underlined |
[img][/img] |
Insert image |
[code][/code] |
Insert program code |
[color=#f00][/color] |
Colored text |
[quote][/quote] |
Insert quote |
[quote=Tim][/quote] |
Insert quote with mention of the author |
[url][/url] |
Insert link |
[url=http://example.com][/url] |
Insert link with link title |
[email][email] |
Insert e-mail address |
[email=info@example.com][/email] |
Insert e-mail address with title |
Login required for commenting: If you select this option, only registered members can add comments. Comments already submitted will still be visible to all visitors of the website.
Disable spam protection: By default, visitors must answer a security question when creating comments, so that the commenting function cannot be misused for spam purposes. However, if you want to allow only logged in members to comment, you can disable the security question here. Since Contao 4.4, this question is only “displayed” to spambots.
Questions
This section explains how to create a question. You can determine the order of the questions within a category by dragging and dropping them with the corresponding navigation ![]() symbol.
symbol.
To create a new question, click on New ![]() .
.
Title and author
Question: Here you can enter the question.
FAQ alias: The alias of a question is a unique and meaningful reference that you can use to access it in your browser.
Author: Here you can change the author of the question.
Answer
Answer: Enter the answer to the question here. The input is done as for the content element “Text” with the Rich Text Editor.
Image settings
Add an image: If desired, you can add a picture to the post.
source file: Here you select the image to be inserted. If you have not yet uploaded the image to the server, you can upload it directly in the pop-up window without leaving the input mask.
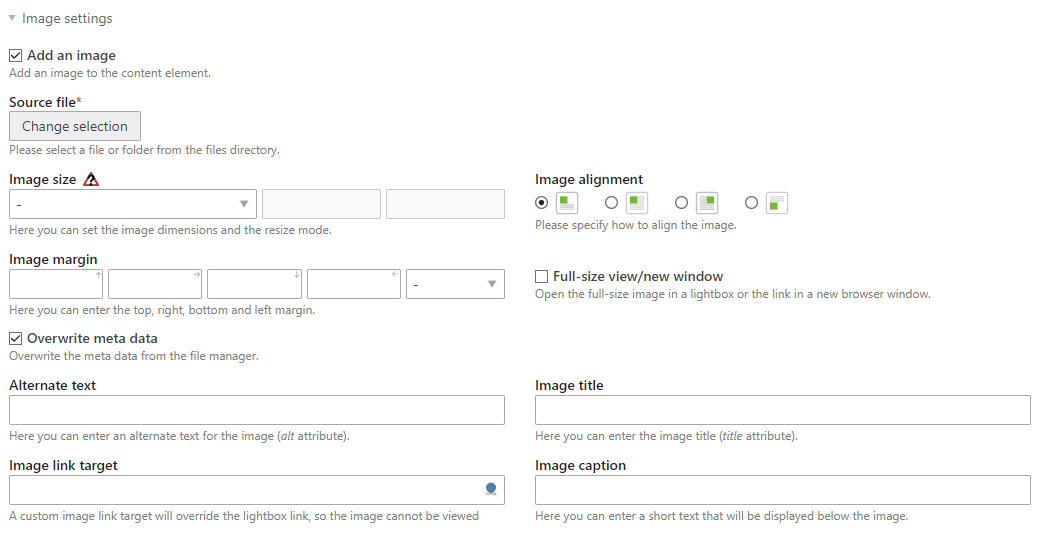
Image size: Here you can specify the desired image size. You can choose between the following scaling modes:
| Relative format | |
|---|---|
| Proportional | The longer side of the image is adapted to the given dimensions and the image is proportionally reduced. |
| Fit to frame | The shorter side of the image is adjusted to the given dimensions and the image is proportionally reduced. |
| Exact format | |
|---|---|
| Important part | Preserves the important part of the image as specified in the file manager. |
| Left / Top | Preserves the left part of a landscape image and the upper part of a portrait image. |
| Middle / Top | Preserves the central part of a landscape image and the upper part of a portrait image. |
| Right / Top | Preserves the right part of a landscape image and the upper part of a portrait image. |
| Left / Center | Preserves the left part of a landscape image and the middle part of a portrait image. |
| Middle / Center | Preserves the central part of a landscape image and the central part of a portrait image. |
| Right / Middle | Preserves the right part of a landscape image and the center part of a portrait image. |
| Links / Below | Preserves the left part of a landscape image and the lower part of a portrait image. |
| Middle / Bottom | Preserves the central part of a landscape image and the lower part of a portrait image. |
| Right / Bottom | Preserves the right part of a landscape image and the lower part of a portrait image. |
Image Alignment: Here you set the alignment of the image. If it is inserted ![]() above,
above,![]() below,
below, ![]() left-aligned or
left-aligned or ![]() right-aligned. When left- or right-aligned, the text flows around the image (as shown by the icon).
right-aligned. When left- or right-aligned, the text flows around the image (as shown by the icon).
Image distance: Here you define the distance between the image and the text. The order of the input fields is clockwise “top, right, bottom, left”.
Large View/New Window: If this option is selected, the image will be opened in its original size when clicked. This option is not available for linked images.
Overwrite metadata: Here you can overwrite the metadata from the file manager.
Alternative text: Here you can enter an alternative text for the image (alt attribute). Accessible web pages should contain a short description for each object, which is displayed if the object itself cannot be displayed. Alternative texts are also evaluated by search engines and are therefore an important tool for onpage optimization.
Image title: Here you can enter the title of the image (title attribute).
Image link address: When clicking on a linked image, you will be redirected to the specified destination page (corresponds to an image link). Please note that for a linked image a lightbox large view is no longer possible.
caption: Here you can enter a caption.
Attachments
Attachments are files that are linked to an FAQ. These files are offered for download in the front end module “FAQ reader”.
Add attachments: Here you activate the adding of attachments.
Attach: Here you can select the files you want to link to the FAQ.
Expert settings
Disable comments: Here you deactivate the comment function for a question.
Publication
As long as an FAQ is not published, it will not be displayed in the front end.
Publish question: Here you can publish the question.