Contao Manager API
The Contao Manager is distributed as a Phar application. Apart from the graphical user interface, the application also provides a REST API to interact with the webserver and Contao application.
The Contao Manager API is available under /api wherever you installed the Phar.
If your website runs on https://example.com, and the Contao Manager has been uploaded as
contao-manager.phar.php to the root folder, the API will be available at
https://example.com/contao-manager.phar.php/api/.
To learn more about the available REST features, please consult our OpenAPI documentation.
Authentication
Authentication is necessary to interact with any API endpoint of the Contao Manager. There are two ways to authenticate, depending on your use case.
Option 1: Temporary authentication using an HTTP-only cookie
This is the preferred approach if your UI is accessing the Contao Manager through the browser, similar to what the Contao Manager does itself. Your UI will not need to store any authentication details, as the browser securely takes care of that. However, these access details also automatically expire, so they are only useful for interactions where the user needs to log in to the Contao Manager prior to any API access.
Consult the OpenAPI Docs on how to use the /api/session endpoint.
Option 2: Persistent authentication through API tokens
For long term authentication or without involving the browser, the Contao Manager supports authentication tokens. Tokens are always bound to a specific user account and work similar to any other OAuth authentication.
The Contao Manager implements standard [OAuth Implicit Grant][OAuth] as far as possible. We are aware that Implicit Grant is not recommended for security reasons, but other OAuth protocols require you to register an application ID prior to accessing the OAuth endpoint. As an example: on Facebook, you have to register as a developer and register your application to get a private key, before you can access the API and get a token. Because the Contao Manager is distributed to every user, we cannot have a (predefined) list of applications that would be allowed to use OAuth.
Creating the API token
Creating a token is only possible after authenticating to the Contao Manager. Technically,
this means a user has to authentication through the /api/session endpoint in a browser,
to then be able to create an access token. Because users should not enter their username
and password on your website (where you could grab the password), the Contao Manager provides
a built-in workflow to get an API token.
Given the URL examples above, all you have to do is point the browser to the following location:
https://example.com/contao-manager.phar.php/#oauth?response_type=token&scope=admin&client_id=XXX&redirect_uri=https://your-website.com/your-script.php&state=XXX
The supported parameters are:
-
response_type(REQUIRED) must be set totokenfor OAuth Implicit Grant -
scope(REQUIRED) is the requested access. Currently onlyadminis a supported value, as the Contao Manager does not yet support permissions. -
client_id(REQUIRED) is a representative name for your application. Theclient_idis also stored alongside the token, eachclient_idwill get a different access token. Requesting with an existingclient_id, a new token will be issued and the existing token is overwritten. -
redirect_uri(REQUIRED) is where the user is sent back to after allowing or denying access to your application. -
state(OPTIONAL) is used to prevent Cross-Site Request Forgery (CSRF) attacks (see OAuth CSRF)
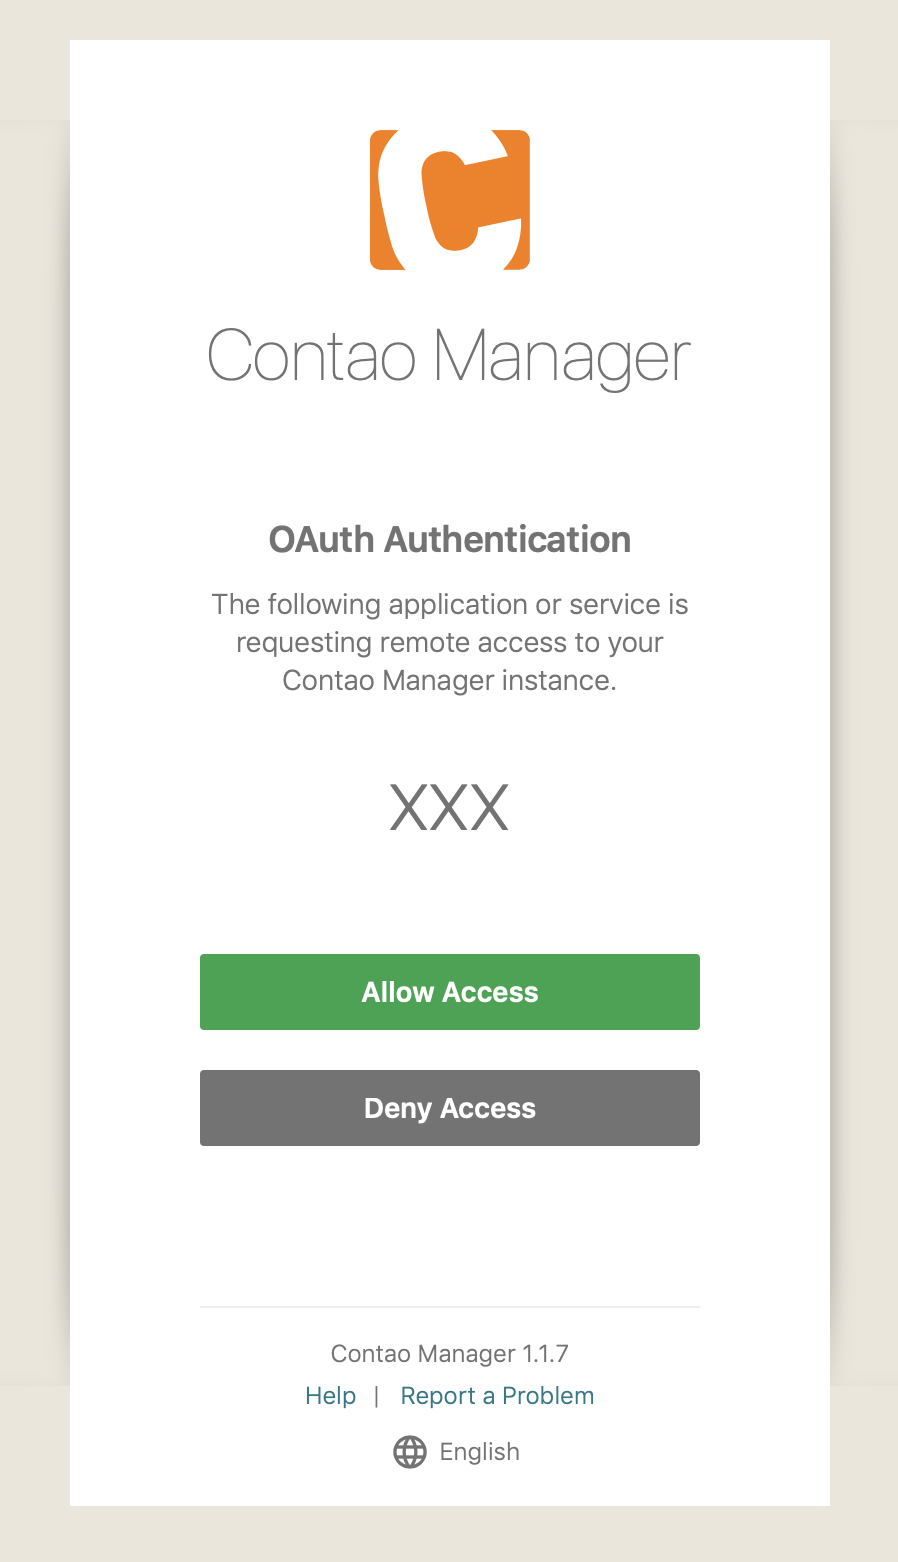
The user will be presented with the following dialog with two options:
-
When clicking on Allow Access, the Contao Manager will generate a token, append it to the
redirect_uriaccording to OAuth Implicit Grant and redirect the user to that URL. You can then read the token from the URL fragment using JavaScript and store it on your application. -
If the user clicks on Deny Access, they will be redirected to the
redirect_uriwitherror=access_denied. -
In any other error case, as long as the
redirect_uriis valid, the user will be redirected back to the resource owner (see OAuth Error Response).
Authenticating with an API token
Now that you successfully acquired a token, you can use it to perform API requests on the Contao Manager. For each request, the token must be sent in an HTTP header.
-
Using tokens for authentication has been standardized as RFC 6750 and is commonly known as Bearer Authentication, which is fully supported by the Contao Manager. Add the
Authentication: Bearer <your-token>to your request header to authentication API requests. -
Unfortunately, there are known issues with some versions of the Apache webservers, which will remove
Authentication: Bearerheaders from your request, so they will never reach the Contao Manager. To circumvent this issue, the Contao Manager supports an alternativeContao-Manager-Auth: <your-token>header for authentication.
If you are in control of the webserver where Contao Manager is running, and you can make sure you don’t run into the mentioned issue, using
the standardized Authentication header is the preferred way. If you need to support any Contao Manager on any unknown host, the best
approach is to use the Contao-Manager-Auth header which will be left untouched by Apache.
One-Time Passwordless Authentication
Contao Manager 1.7+ supports one-time passwordless login URLs. Using a one-time token, users can be logged in automatically to the Contao Manager front end in the browser. A use case would be a tool that has API access to the Contao Manager, which can then generate a URL that automatically logs a user in to the Contao Manager front end without requiring username and password.
One-time tokens are valid for 30 seconds and can be used only once, as their name suggests. They can be created using
the Contao Manager API by creating a new token with a grant_type=one-time parameters. The response will include
a url to the Contao Manager for passwordless login. See the OpenAPI documentation for details.