Adding Custom Back End Routes
This guide assumes a Contao version of at least 4.13. Back end routes can be created in previous Contao versions as well, but might require additional steps.
You can use the Contao back end to display content generated in your own custom Controllers. This way you can develop custom extensions without the need to use DCA configuration. The following example can be changed according to your own setup. For example you’re not obliged to use the annotation configuration for your routes you could use XML or YAML interchangeably.
Create your Controller and Template
The first step is to create your own Controller. A more detailed explanation
on how Symfony Controller work can be found in the Symfony documentation.
The Controller class is placed inside the Controller directory
and is configured through annotations.
// src/Controller/BackendController.php
namespace App\Controller;

use Contao\CoreBundle\Controller\AbstractBackendController;
use Symfony\Component\Routing\Annotation\Route;
use Symfony\Component\HttpFoundation\Response;

#[Route('/%contao.backend.route_prefix%/my-backend-route', name: self::class, defaults: ['_scope' => 'backend'])]
class BackendController extends AbstractBackendController
{
    public function __invoke(): Response
    {
        return $this->render(
            'my_backend_route.html.twig',
            [
                'error' => 'Oh no, an error!',
                'title' => 'My title',
                'headline' => 'My headline',
                'version' => 'I can overwrite what I want',
                'foo' => 'bar',
            ]
        );
    }
}
In order to have a correct Contao back end route, we need an additional request parameter called _scope with the value backend. This way
you are telling Contao that this route belongs to the back end and should be handled accordingly. See this article for more
information about the backend scope.
Be sure to have imported your bundle’s Controllers in your routes.yaml before
the ContaoCoreBundle routes.
# config/routes.yaml
app.controller:
    resource: ../src/Controller
    type: annotation
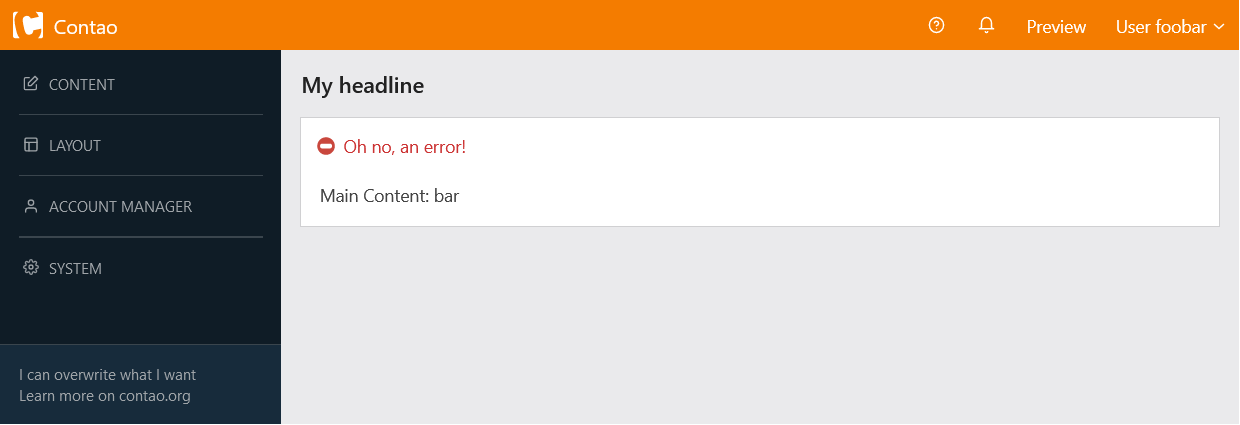
Our route will render the template my_backend_route.html.twig which must be placed
into /templates.
{% extends "@Contao/be_main" %}

{% block main_content %}
    <div class="tl_listing_container">
        Main Content: {{ foo }}
    </div>
{% endblock %}
This example renders like this:
Extend the Back End Menu
Most of the time you probably want to add a menu entry for your back end module.
Since the back end menu can be extended with an EventListener we can easily
create one that listens for the menu event to be dispatched.
// src/EventListener/BackendMenuListener.php
namespace App\EventListener;

use App\Controller\BackendController;
use Contao\CoreBundle\Event\ContaoCoreEvents;
use Contao\CoreBundle\Event\MenuEvent;
use Symfony\Component\HttpFoundation\RequestStack;
use Symfony\Component\EventDispatcher\Attribute\AsEventListener;
use Symfony\Component\Routing\RouterInterface;

#[AsEventListener(ContaoCoreEvents::BACKEND_MENU_BUILD, priority: -255)]
class BackendMenuListener
{
    protected $router;
    protected $requestStack;

    public function __construct(RouterInterface $router, RequestStack $requestStack)
    {
        $this->router = $router;
        $this->requestStack = $requestStack;
    }

    public function __invoke(MenuEvent $event): void
    {
        $factory = $event->getFactory();
        $tree = $event->getTree();

        if ('mainMenu' !== $tree->getName()) {
            return;
        }

        $contentNode = $tree->getChild('content');

        $node = $factory
            ->createItem('my-module')
                ->setUri($this->router->generate(BackendController::class))
                ->setLabel('My Modules')
                ->setLinkAttribute('title', 'Title')
                ->setLinkAttribute('class', 'my-module')
                ->setCurrent($this->requestStack->getCurrentRequest()->get('_controller') === BackendController::class)
        ;

        $contentNode->addChild($node);
    }
}
This EventListener creates a new menu node and handles its own current state by
reading and matching the controller class, which Symfony provides under the _controller
request attribute by default.
The EventListener registers itself to the contao.backend_menu_build event by using
a @ServiceTag annotation directly in the PHP file.
This allows us to skip defining a service tag in the service configuration. We
purposely assign it a low priority, so that we can be sure to be loaded after the
Contao Core EventListeners. Otherwise, the content node we assign ourself to will
not be available yet.
And that’s it. You controller should now be callable from the main back end menu in the sidebar.